☢ Creating Your First Voicebank ☢
This resource is intended as a walkthrough for creating your first UTAU voicebank. It is aimed at absolute beginners and does not assume any prior knowledge of UTAU beyond what's covered in the introduction page. If you need help with terminology or linguistic concepts, check the vocabulary page.
☆ Introduction ☆
Before we begin, be sure that you've already set your system locale to Japanese (remember that this is different from setting your computer's region or language) and installed UTAU and/or OpenUTAU to your computer. I will be including instructions for both engines here, but most of this is applicable to either one.
Also know that the instructions outlined here are not the only way of doing things (as might be obvious), but rather what I, after much consideration, feel will best help you get accustomed to voicebank creation. I will do my best to explain everything thoroughly without bogging you down with text.
Some things here may seem more "advanced" than other beginner tutorials, but I believe that many common pieces of advice given to newcomers are remnants of the early days of the community and have never quite been updated to match modern tools and methodologies. This is part of my motivation for writing this guide; I want to get new users accustomed to the methods that have become community standards over the past decade rather than adhere to the idea that you have to learn the "old way" of doing things first — especially when the "old way" is often more difficult or tedious.
In this tutorial, we will:
- Set up the voicebank folder and other important files
- Record a Japanese voicebank using a dedicated voicebank recording software
- Configure the voicebank's samples using a template file and an editor application
- Use the voicebank in both Classic UTAU and OpenUTAU along with a premade UST
- Package and distribute the voicebank
- Troubleshoot common problems encountered by new UTAU users
File Downloads and Organization
Here are the links to everything we'll be using for this tutorial:
- Classic UTAU for Windows and/or OpenUTAU for Windows, MacOS, and Linux
- OREMO for Windows; OREMO for MacOS (recording software)
- For Ubuntu, Android, and iOS: RecStar
- VLabeler for Windows, MacOS, and Ubuntu (configuration file editor)
- GuideBGMs (recording tool for use in OREMO)
- Tutorial Reclist (list of recordings we will use in OREMO)
- Base OTO (template configuration file)
- Demo UST, USTX, and MIDI (for voicebank testing and practice usage)
- Iroiro2 (plugin for use in Classic UTAU) (optional)
- Demo Voicebank (for reference and practice usage) (optional)
I will explain more about each of these and why they are helpful in their relevant sections. I'm primarily a Windows user and both of my computers run on Windows 10, so this is what I will be using to demonstrate.
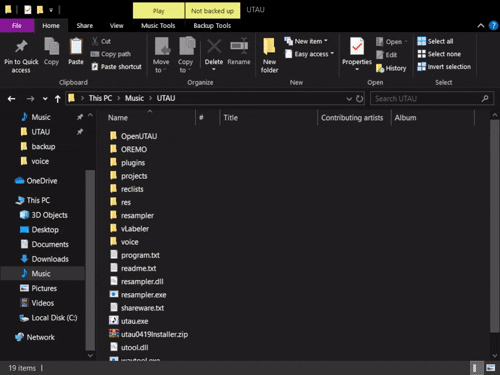
In theory, you can download these files and extract their contents where ever you'd like to as long as you're able to easily access them, but I find it's most convenient to create a few folders inside of my UTAU program folder. (I also keep OpenUTAU's program folder in here, but you don't have to do that, either).
If you want to keep things organized, open up your UTAU program folder — as a reminder, this is the folder with utau.exe in it — and create four new folders. Name them OREMO, vLabeler, reclists, and projects. Download OREMO and vLabeler into their respective folders and exctract their contents.
Note: If you don't see an option to extract the compressed files, remember that you'll need an application like winrar or winzip to do this.
Next, download the guideBGMs into the folder within your newly created OREMO project folder named guideBGM. I'd recommend keeping them within their own subfolder for organization, especially if you plan to use other guideBGMs in the future.
For the reclist, download or save it as a .txt file into the UTAU/reclists folder we just made. You only need to download the CV Only list; the other is optional.
For the demo USTs, download and extract these inside of UTAU/projects. I like to keep all my projects in separate subfolders for easy organization; this is especially useful if you're working on songs with lots of different parts.
If you want to use Iroiro2 in classic UTAU for UST lyric conversion (and other useful features), download and extract that into its own subfolder within UTAU/plugins. Make sure there's not an unnecessary extra subfolder when you extract it so that it will show up in the plugin menu.
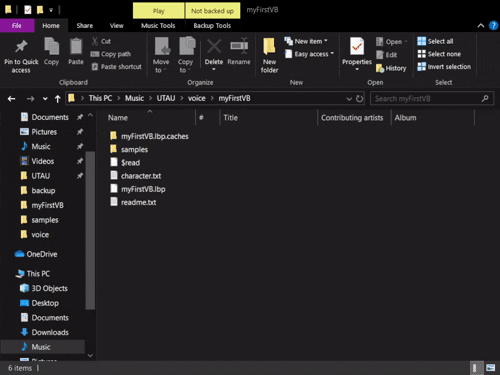
If you want to look at or practice with the demo voicebank, download and extract that into its own subfolder within UTAU/voice. Like for the plugin, make sure there's not an extra layer of subfoldering when you extract it; the core contents of the voicebank (character.txt, readme.txt, and etc.) should be directly in the root.
When you're all done, your files should look something like this:
☆ Voicebank Set-Up ☆
First thing's first, before we get to recording, we need a place to store all of those audio files. We could record them in a temporary folder and move them into a voicebank folder later, but it's often easier to cut out the unnecessary step and create the voicebank folder from the get-go.
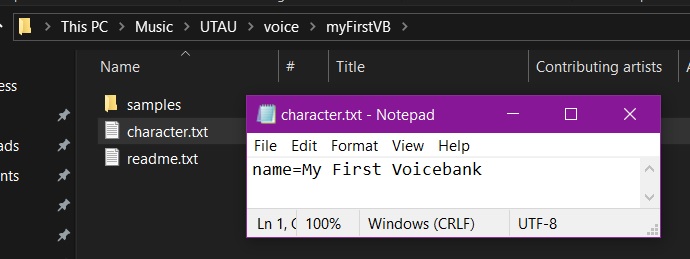
Inside of the UTAU program folder, open up the folder named voice.
Within this folder, create a new file and name it whatever you like. Typically, these are named for the character which represents the voicebank, along with the specific voicebank name and sometimes a version number, such as KATSUmultiex_jpn_v1.1 but if we don't know any of that yet, we can give it a temporary name like myFirstVB and change it later.
Inside of this newly-created folder, which we'll call the root folder of your voicebank, we'll want to create a couple things.
First, let's make a folder for our audio files to go into. We could leave these inside of the root folder, but I find it keeps the voicebank more organized to put them into a subfolder, and also is good practice for if you want to move on to making more complex voicebanks in the future. Most often, these will be named based on the pitch of the included samples, such as E3 in my case, but if you don't know what that is yet, you can give it a temporary name and change it later, or just name is something like samples.
Next, right click on some empty space in the root folder and navigate to New > Text Document to create a blank text file in the folder. Name this character.txt. Do this again, and name the second file readme.txt.
You can leave readme blank for now, but let's open up character in a text editor (Notepad will work fine) and give our voicebank a name. This is what tells UTAU that this is the root folder of a voicebank, and is what will be displayed in the voicebank list of either software. Once again, this can be something temporary if you don't have one in mind yet. In the text editor, type something like this, and save the file:
name=My First Voicebank
Do not include whitespace like tabs or spaces around the = or before name; including spaces in the name's value is fine. character.txt will typically have other declarations in it as well, but name is the only one we need to set for now.
We'll come back to these files when the voicebank is finished. For now, we're ready to move on to recording.
Note: If you plan to work exclusively in OpenUTAU, do all of the above steps in the Singers folder inside the OpenUTAU folder. Opening OpenUTAU at least once will create this folder automatically. If you plan to use both softwares, follow the instructions for Classic UTAU so that your voicebank will show up in both.
If you installed OpenUTAU via the Windows installer, the Singers folder will be in C:\Users\[user]\Documents\OpenUTAU. If you installed the portable version, it will be inside of the folder that you extracted from the zip file.
☆ Recording ☆
Recording Pitch & Style
Some advice may tell you that your voicebank's audio should be spoken rather than sung, but this is not quite accurate. Rather, it should be sung on a stable pitch. In other words, all of the samples included in the voicebank should be held on the same musical pitch with minimal vibrato and pitch bending. Think of it like singing in a monotone.
For some good examples of this, think of the vocals in 'Mr. Brightside' by The Killers or 'Losing My Religion' by R.E.M.; there's not a lot of pitch movement going on there, but it's still definitely singing.
To figure out what pitch you should record at, you can use a digital tuning fork like this one or a physical instrument like a piano. Sing along with various notes until you find a pitch that you're comfortable sustaining for a few beats at a time, and make note of it. There's no right answer here; it's entirely dependant on your own voice and what you want the voicebank to sound like.
The format for these is Note Name + Octave. For people with deeper voices, a comfortable pitch will most likely be in the third octave (C3 to B3). For people with higher voices, this will most likely be in the fourth octave (C4 to B4).
If you want to record the voicebank in a particular singing style, this is not only doable, but something I encourage. You don't have to know the acoustics or physiology involved, but think of how you imitate your favourite singers when singing along with them, and try to replicate that style in your voicebank.
Remember to avoid vibrato and extreme pitchbends, but evoking the singing style of a particular genre will help lend your voicebank to working better when used in that genre. Recording in an expressionless tone is fine, of course, it just might not be as emotive as you'd like; tuning can only do so much. For example, I tend to do a pop-punk sort of style for KATSU's clean vocals, because I often use him for rock and metal (to say nothing of the growl banks).
Lastly, it's good to do at least a quick vocal warm-up before recording to get your throat muscles ready for singing. It's also often better to record in the morning before you've spent all day talking so your throat will be more relaxed.
Hardware & Environment

In order to record your voicebank, you'll of course need some kind of microphone. For your first voicebank, don't worry about investing in some fancy new recording set-up; you can think about upgrading your tech later once you know you're invested in voicebank development or other things that involve vocal performance.
For now, it's fine to use what you already have, be it a headset mic, USB mic, or even your cellphone. The only thing I'd really advise against is using a webcam mic if you can help it, as they tend to be pretty poor quality.
You'll also want a pair of headphones or earbuds. Any old pair of will work fine. This will prevent any noises from your computer from getting picked up by your microphone, which will be important when we get to our recording method.
Lastly, you'll want to record in a quiet environment with minimal background noise and, ideally, good sound absorption. Obviously, you can use a dedicated recording booth if it's available to you, but I'm going to assume you're most likely recording at home.
Turn off fans, ACs, and any other white-noise-makers (if you are able to) to avoid interference. Some amount of noise can be cleaned up by using a noise removal filter, but having to do any sort of post-processing on the audio files is more work, and noise removal can make your recordings sound tinny, so it's better to avoid picking it up in the first place. Things like people talking, dogs barking, TVs, music, loud vehicles, and so on cannot be filtered out and will interfere with the clarity of your recordings.
For sound absorption — that is, preventing your recordings from having a lot of reverb or echo — rooms with carpet or rugs are preferable. It's sometimes recommended to record in a closet as the clothes hanging up can also absorb sound, though in my experience they sometimes have worse reverb that a more open space. Rather, my recommendation for quick and easy sound absorption is to record under a heavy blanket, like a comforter. I drape one over myself and my computer whenever I record. For even more absorption, you can record on your bed if you're using a laptop or phone.
Especially with no AC + being under a heavy blanket, it can get pretty hot while you're recording, so take breaks as needed, and keep water nearby to stay hydrated.
Software & Tools
While we could work in a general purpose recording software like Audacity, there are multiple softwares which exist specifically for voicebank recording, and which come with built-in tools to make the process smoother and faster. These are what's typically used by intermediate and advanced users, and as such, we'll be working in one of these instead.
Specifically for this tutorial, I'll be walking you through recording in OREMO. OREMO is a desktop application made specifically for UTAU voicebanks, and is more-or-less the current community standard. To download OREMO, see here for Windows and here for MacOS.
If you are recording on a cellphone or a Linux device, you can instead use RecStar; however, I don't personally have any experience recording on a mobile device, and while RecStar seems like a promising alternative to OREMO, it is somewhat early in development and therefore subject to having any usage tutorials become quickly outdated. As such, I will be using OREMO for now, but may update this tutorial in the future once RecStar is a bit more established.
You'll additionally want to download these guideBGMs. A guideBGM is an audio track that will play while you record to help you keep your timing and pitch consistent. Using a guideBGM is technically optional, but I really recommend them, and I will be using the specific tracks linked here for this tutorial if you want to follow along exactly. You can find more information as well as more guideBGMs I've made here.
Reclist
Before we record, we of course need to know what to record — and that's exactly what reclists (recording lists) are for. They are lists of text strings that will be read aloud, with each string saved to a separate .wav file. All of the necessary samples for the voicebank will be pulled from these strings; the voicebank can only sing what we put into it, after all.
Japanese CV (consonant-vowel) is one of the most basic types of reclist for a natural language, as it contains single-syllable samples recorded in isolation, and is what UTAU was built for initially. As such, it's what most beginner tutorials recommend starting with. However, I am going to take a slightly different approach, and I will explain why.
For this tutorial, we'll be using a modified version of the Japanese 2-Mora CVVC (consonant-vowel-vowel-consonant) reclist — but don't panic, we're going to treat it like it's a CV. As in, we are only going to sample one CV per audio file, but we're going to record it in CVVC style.
There are multiple reasons for this:
- The modified list is the exact same number of recordings as the Standard CV list, so it is not any more difficult or time consuming to record in comparison
- It is a lot easier to visually see where the parameters are meant to go during configuration when there is a vowel before the CV
- Samples taken from phrasal contexts tend to sound more natural than those taken from isolated syllables
- Additionally, most CVs in a song will occur in the middle of a phrase, so it makes more sense acoustically to use CVs that are sampled after leading vowel
- It gets you used to recording in strings along with a metronome or guideBGM
- It is not very difficult to turn this into a CVVC voicebank later, should you so choose
The main difference between the reclist I am providing here and the one on the CVVC page is that I have separated the recordings necessary for CV from those that aren't, and placed the others in an optional list you can add on if you want to be able to turn the voicebank into a CVVC later.
The reclist itself is provided below:
CV Only (136)
Optional for CVVC (52)
To save the list to your computer, you can either hit the Download TXT button underneath the reclist to save a .txt somewhere, or copypaste the text inside the above box into a blank notepad file and save it as a .txt.
Setting Up OREMO
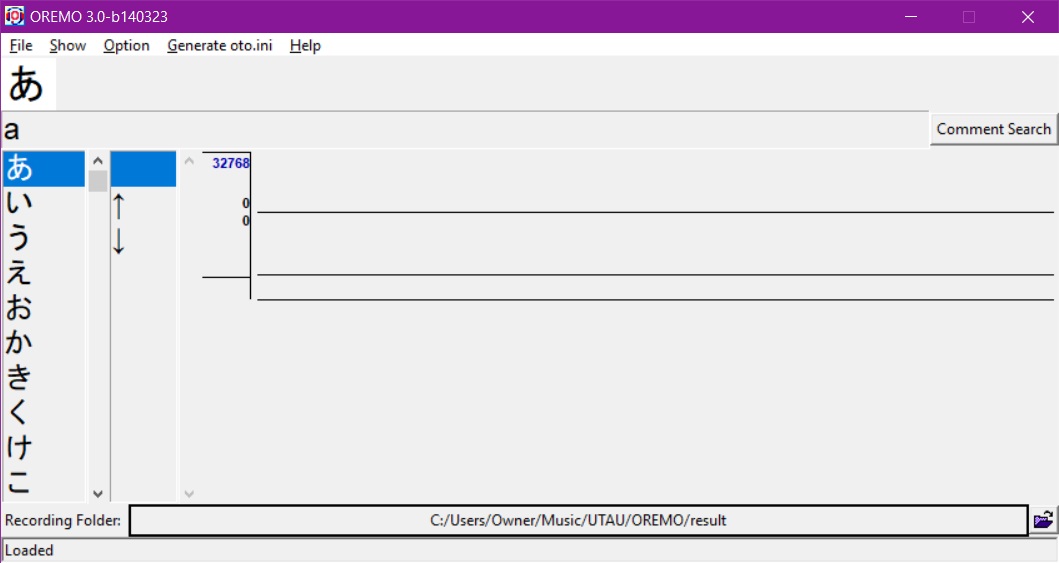
When you first open up OREMO, it will look like this:
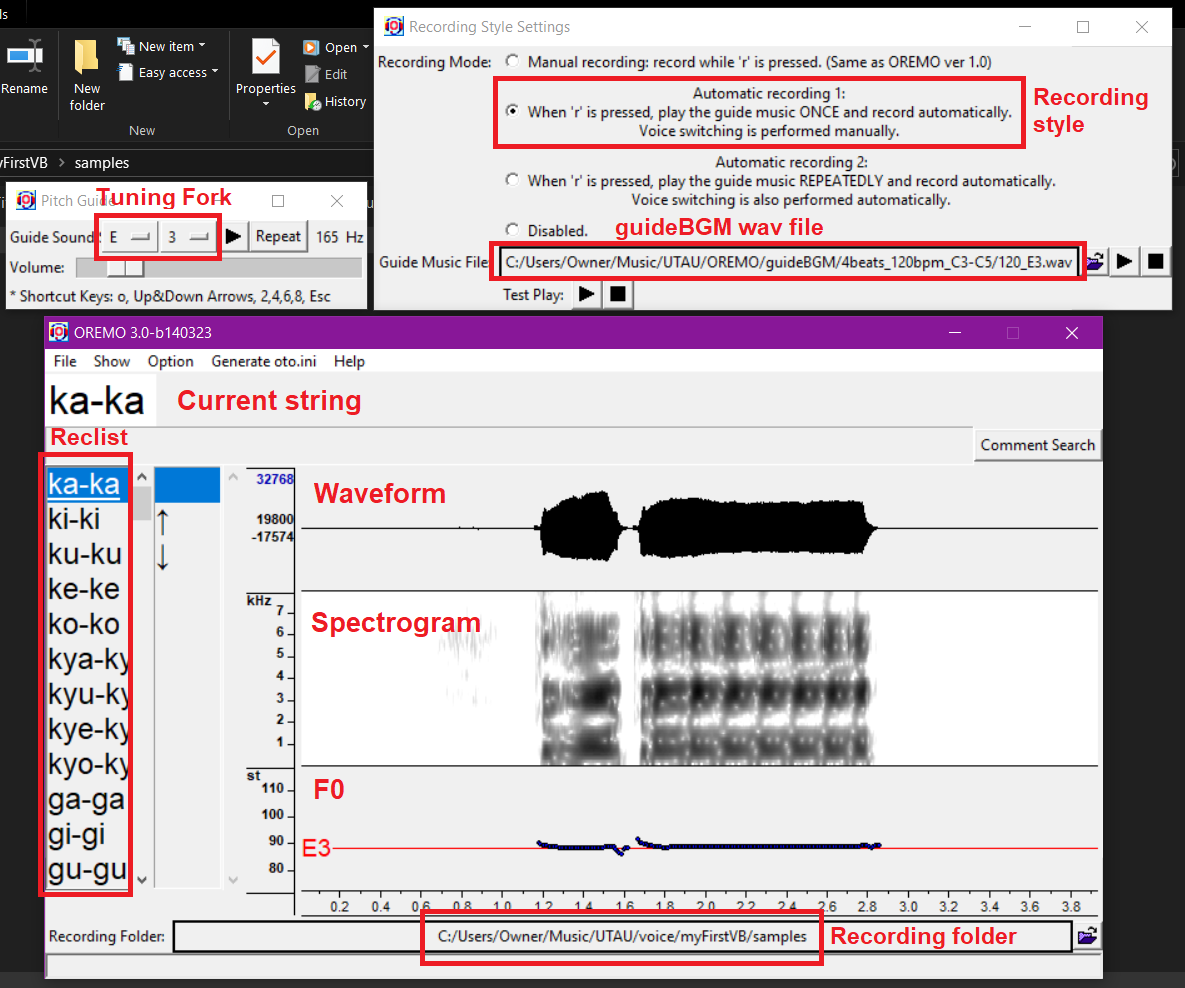
First, let's make sure we're using the correct input device (microphone) and output device (headphones). Navigate to Option > Audio I/O Settings. Set Input Device to your microphone and Output Device to your headphones. The other settings should be fine as-is. Click OK when you're done.
Next, let's select our Recording Folder by clicking on the bar at the bottom of the screen. Find the subfolder you created earlier within your voicebank's root folder in the file browser. Remember, it should be located in UTAU/voice.
Now let's load the recording list we want to use. To do this, navigate to File > Load Voice List, then use the file browser to find where you saved the reclist to. Click on the .txt file and hit Open. Now, the left bar of the window should display the reclist we loaded, and the currently selected string should appear in the top bar. To move between selected strings, click on them or use the up and down arrows on your keyboard.
Next, let's set up how the audio is displayed visually. By default, it will show the waveform of each recording, which is a visual representation of the physical sound wave, but we want it to give us a little more information than that.
To show the spectrogram, a visual representation of the frequencies being produced, go to Show > Show Spectrogram.
To show the F0, AKA the fundamental frequency or musical pitch of the recording, go to Show > Show F0. To set a target pitch, go to Options > Advanced Settings, find where it says Show Target Tone and click on the checkbox. Set the Target Tone to the pitch you will be recording at.
Now, we can see the waveform, frequencies, and pitch of every audio file we record, which will clue us in to a lot of important acoustic information. You may not know how to read these visuals yet, but you'll get a feel for how they should look for each sample with more practice, and they'll be especially important for configuration.
Next, navigate to Show > Show Pitch Guide to open up the Tuning Fork. Set the Guide Sound to the pitch you want to record at. When you hit the Repeat button here, or hit O on your keyboard, it will play a continuous tone in the target pitch, which you can use to periodically match pitch with to help you stay in-tune. This is optional to use, but can be helpful.
Finally, navigate to Option > Record Style Settings. This will open up the menu of the same name. Here, we'll want to select either Automatic recording 1 or Automatic recording 2. Option 1 will play the guideBGM once when you press R on your keyboard, with you manually moving on to the next string after each recording. Option 2 will play the guideBGM repeatedly until it is stopped by pressing R again. Option 1 is probably better if you're not used to Japanese pronunciation.
To select the correct guideBGM, click the bar labeled Guide Music File, navigate to the guideBGM folder we created earlier, and and locate the .wav file that corresponds to the pitch you want to record at, for example E3_120_4b.wav. Make sure to select the .wav file and not the .txt file.
Alternatively, you can select Manual recording and sing along with a metronome instead. To do this, navigate to Show > Show Tempo Guide, set the Tempo to 120 BPM, and hit M on your keyboard to start and stop. Then, hold down R to record each string. This is a little more tedious, though; the guideBGMs are easier to work with and have consistent timing for easier configuration.
If you've done everything corretly, your interface should now look like this. I've loaded a .wav file into it for a more clear visual of each section, and labeled the relevant settings.
To save the current OREMO settings and not have to set all this up again every time you want to record, navigate to File > Save Current Configurations to Initialisation File and save it as oremo-ini.tcl in the OREMO program folder. If it asks you to replace an existing file, click Yes.
At last, we are ready to record!
Recording Your Voicebank
With all of that boring stuff out of the way, we can finally get to the fun part. The reclist is written in romaji, which is pretty intuitive for non-native speakers, but some sounds may be tricky. If you need help with pronunciation, see this pronunciation guide for the phonetic transcriptions, English approximations, and pronunciation notes. I also recommend listening to native speakers, be it listening to actual human vocal performances or the audio files of a native Japanese voicebank.
A specific sound I want to highlight is Japanese /r/, because it tends to be the most difficult to grasp. If you say words like <ladder> or <little> in American or Australian English, the consonant sound in the middle gets reduced to what we call a tap consonant rather than being a fully articulated /t/ or /d/ sound. This is actually the same phonetic sound as Japanese /r/. Alternatively, if you're familiar with Spanish, think of a Spanish /r/ that isn't trilled. If you struggle with this sound, you can approximate it with an English /l/.
Similarly, be careful with your vowel sounds, as they're not exactly like their English approximations. They are much closer to Spanish vowels than English ones. Overall, though, having a native-like pronunciation isn't the end-all-be-all to making a good voicebank. As long as you try your best, your voicebank should sound fine.
To start the recording, hit R on your keyboard. The guideBGM will count you off for four beats, then play four quarter notes with a piano sound. These are what you will sing along with.
A chime will sound on the 4th beat, which is your cue to inhale and get ready to sing on the 5th beat. The first syllable should only be held for one beat, but you can hold the second one for longer if you would like since there's nothing after it.
The guideBGM has a total of 12 beats and is exactly 6 seconds long. The recording itself will start on the third beat, and stop on the tenth beat, leaving some silence as a buffer on either side of the recording to prevent any of the utterance from being cut off.
Here are some examples of what this will sound like (recorded at E3):
Move down the reclist either manually or by using Automatic recording 2, and sing each syllable pair. When you get to the vowels, hold a stable vowel sound for a minimum of two beats.
If you want to listen to how a string sounds, stop the automatic recording if its playing, go to the string you want to listen to, and hit SPACEBAR on your keyboard. If you want to rerecord that string, simply hit R while it is selected — if you don't want to overwrite any of the following strings, though, be sure to use Automatic recording 1 for single-string retakes.
OREMO will automatically export each .wav file whenever you move on to a different string and name it whatever the string is labeled in the reclist. All in all, the recording process will most likely take you between 30 minutes to an hour; expect it to be on the longer end of that if you take a break or two during. When OREMO reaches the end of the list, it will stop automatically. Hit the down arrow on your keyboard to jump back up to the top of the list and save the final .wav file.
☆ Configuration ☆
Setting Up the OTO.INI
Now we have all of audio recorded, but we have one more task to complete before our voicebank is ready to be used: sample configuration. This is also called otoing because the voicebank configuration file is named oto.ini. We'll be working with a base oto, which is a template meant to make the otoing process faster and easier by already naming each sample and setting the approximate values for each parameter. We'll still need to edit each sample individually, but using a base cuts down a lot of the more tedious parts.
You can download the base we'll be using here. Place this file inside of the folder that contains your voicebank's audio files. If these are in a subfolder, place it inside the subfolder. If there is already an oto.ini file in there, replace it with this one.
The oto is just a text file, so you could potentially create it yourself, or have UTAU initialize it by loading the voicebank in the software, but to avoid problems with incorrect character encoding, I'd recommend using the downloaded version.
The text of the base oto is also provided below, if you want to preview what it looks like or set up your own file:
CVs Only (136)
Don't worry about what the different numbers mean yet, we'll talk about those shortly.
Note: If you've changed any of the file names so that they're different from how they're written in the reclist, such as by adding a prefix or suffix to them, make sure to change the file names in the base oto, too. You can do this by opening the oto.ini in a text editor and using find+replace and/or regular expressions.
If you want to later add oto entries for the phrase-initial syllables or to turn this into a full CVVC voicebank, you can append either or both of these segments to the oto's text:
Initial CVs and Vowel Endings (148)
VCs and Vowel Blends (150)
Highlighting both/either of the above segments and copypasting them into your existing oto.ini should not cause any problems, but be careful not to accidentally overwrite any existing entries. Make sure each entry is still in its own text line, and that there are no empty lines in the oto, otherwise UTAU will give you an error when you try to load the voicebank.
For now, though, let's just use the base for CVs only.
Testing the Voicebank
Before you spend a lot of time configuring the voicebank, you can use the base oto to do a quick test render and make sure there aren't any problems with your audio files. This is optional, but can save you some trouble if, for instance, you find that there's something like a mysterious buzzing noise in all of your recordings... (this has happened to me more than once).
To do this, skip ahead to the Using Your Voicebank section to see how to load your voicebank in the software, and test it with the provided demo USTs.
Don't expect the test render to sound "good"; we're just checking for audio problems in the recordings. It will probably sound like a choppy mess, but it should at least be making sound, and that sound ideally shouldn't have any loud buzzing, shrieking, or harsh noise. We'll test it again after we oto it.
One or two recordings not sounding right can be solved by simply rerecording the problem strings (though note that if you've already configured them, you'll have to edit their oto entries) or editing their frequency files (I will cover this in-depth in a future tutorial). If every sample has the problem, though, it's likely to do with your microphone or recording environment.
Keep in mind also that the resampler has an effect on the render; you can try it with a few different ones and see if that solves the issue, then make note of which resamplers work for the voice and which ones don't. Here's a comparison of the same voicebank and UST used with a few different resamplers:
If all is well, we're good to start editing the oto.
Troubleshooting
If it's not singing at all, first make sure that your audio files are .wavs, and not a different format like .mp3. If you used OREMO, they should have been exported as .wavs automatically.
If they are .wavs, try opening them up in an audio player to listen to them and make sure they sound fine to you there.
If this isn't the problem, open up the Voice Configurations window in classic UTAU, and make sure that the Alias collumn is displaying actual Japanese character and not garbage characters. If they don't look right, there's an encoding problem in your oto; see here for how to fix this.
If this isn't the problem either, it might just be a result of the base oto not exactly matching with your samples. If you used the guideBGMs, though, this shouldn't be an issue, but if you didn't, then open up the Voice Configurations window, find a sample that isn't making sound, and click on Launch Editor to look at the visual editor. If the entire sample is blue or if the white area isn't lined up with the waveform, then this is the problem, and it will be fixed during the otoing process.
If all else fails, you can try asking for one-on-one help on somewhere like UtaForum or the St. Defoko's Discord Server (who knows, I might even be the one to help you).
Setting Up VLabeler
UTAU comes with a built-in oto editor, but this isn't the most optimal to use. Seasoned UTAU users will often choose instead to use an external application with more features and quality-of-life improvements to make the configuration process faster and easier.
Here, we're going to be using a software called vLabeler. Another commonly used software is setParam, but its not as versatile as vLabeler and is overall a little more dated.
To create a new vLabeler Project for your voicebank, open up the software and click New Project. On the Directory Settings page, click on the file icon in the box labeled Sample Directory, locate and open the root folder of your voicebank, then click Select Folder. The project name will automatically be the name of the voicebank, but you can rename it if you want.
Click Next to go to the next page. Here, make sure the Category is set to UTAU, and the labeler is set to UTAU singer labeler.
Click Next again. On this page, make sure that Create by... is set to Default. Under Advanced Settings, make sure that Encoding is set to Shift-JIS, and turn on Auto-export so that you don't have to manually export your oto.ini file.
Now click Finish. These are the project settings you will use for the vast majority of UTAU voicebanks.
Your voicebank should now load in the visual editor, with the first entry in the oto already selected. All of the oto entries in the voicebank will be visible on the right side of the screen. To move between them, click on a particular entry, scroll up and down with your mouse wheel, or use the up and down arrow keys on your keyboard.
By default, the waveform and spectrogram will both already be visible; this is typically all we need in terms of visuals, and you can change their appearance in Settings > Preferences > Charts if you would like. The name of the currently selected sample will be visible on top of the screen and will be highlighted on the sidebar.
To zoom and and out, use the +/- buttons in the bottom right.
To show the numerical values of the current sample's parameters, go to View > Show Properties or hit CTRL+1.
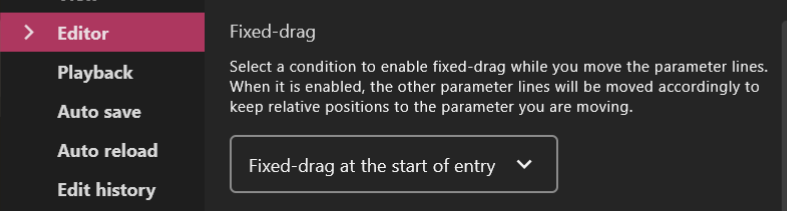
Before we begin, there is one setting we should change to make our editing a little bit easier. Navigate to Settings > Preferences > Editor and scroll down to where it says Fixed-drag. In the dropdown menu, select Fixed-drag at the start of entry. Click OK to return to the editor.
Now we're ready to start.
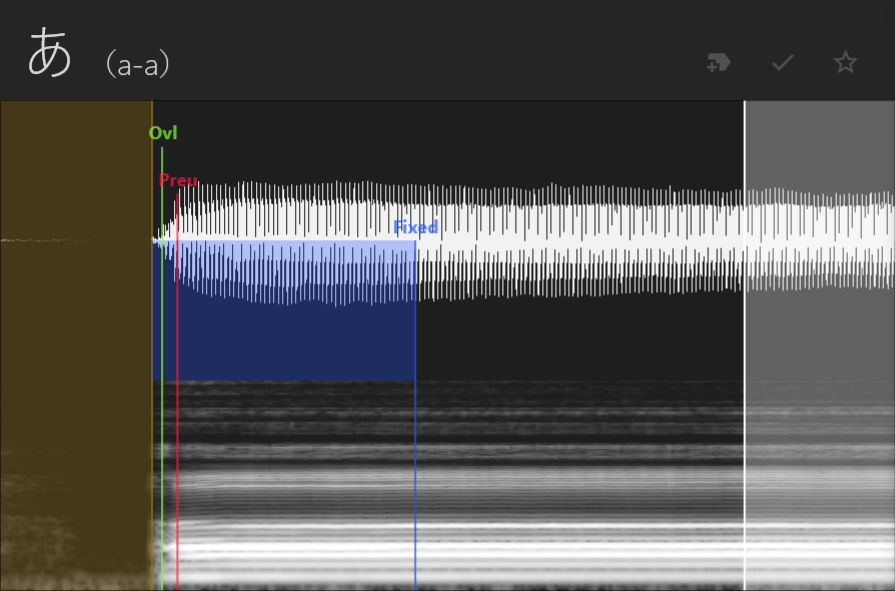
Parts of the OTO
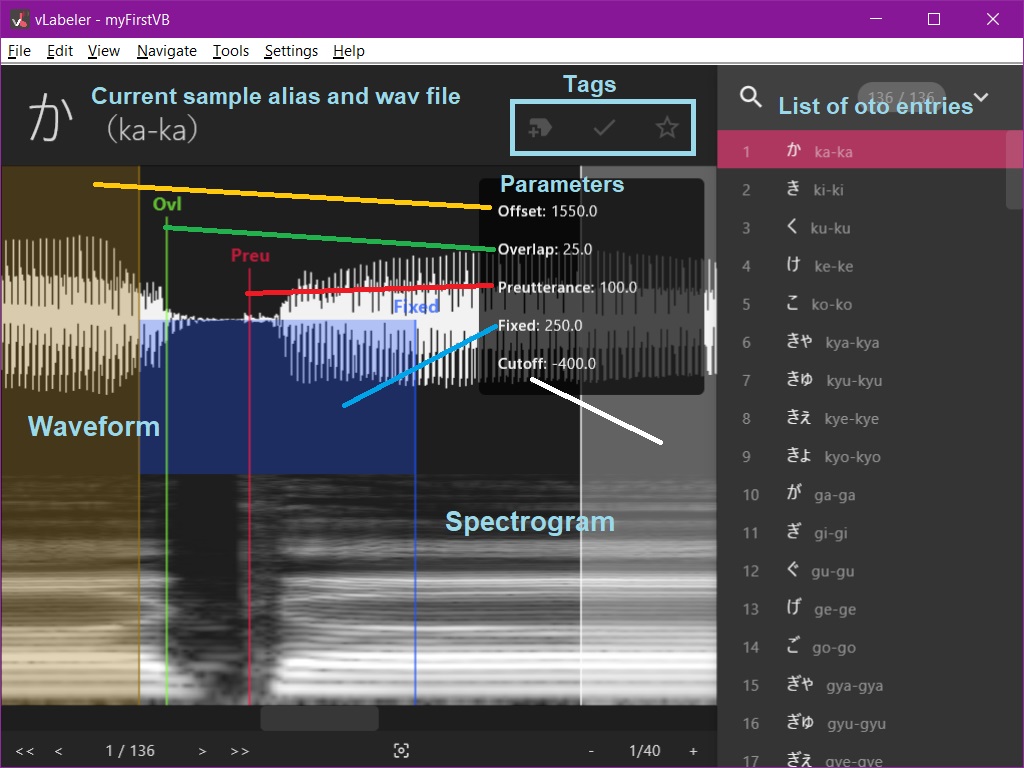
In order to understand what we're looking at here and how we should be editing these parameters, let's go over what each part of the oto does.
Every oto entry has eight components:
- File name
- Alias
- Offset, also called Left Blank or Start
- Cutoff, also called Right Blank or End
- Fixed Area or Consonant Area
- Unfixed Area or Stretching/Looping Area
- Preutterance
- Overlap
I've colour-coded them based on how they appear in the vLabeler visual editor; refer to the screenshot in the above section. Note that everything here is measured in milliseconds.
The file name is straightforward; it's the name of the .wav file the sample is being pulled from. The alias is the unique name of a given sample, and what will actually be used inside of UTAU to call specific samples. Neither of these should need to be adjusted here, as the base oto has already set them up for us. In more complex voicebanks, a single .wav file may have multiple samples being pulled from it, and therefore multiple aliases.
The offset and cutoff are the points at which the sample starts and ends. Setting both of these values to 0 will play the entire audio file, though this is not typically what we want.
The fixed area (as it's called in vLabeler) is the portion of the sample that will not get stretched or looped in the synth engine. In other oto editors, this is usually called the consonant area, but the name is a little misleading, since it will almost always contain more than just the consonant itself.
The inverse of this, what we'll call the unfixed area, does not have a numerical value stored for it, but rather is the portion of the sample between the fixed area and cutoff. This is everything that will be sustained for as long as a note is being held in a song.
Preutterance is the position at which the sample will line up with where a note is placed on the piano roll. In other words, its position is what will line up with the beat, and everything before this point will play before the beat hits. It should also fall within the fixed area, otherwise we'll get a strange scenario where the sample starts stretching before it hits the beat.
Finally, we have the overlap. This parameter is how much of the sample will be crossfaded with the previous sample. Its value shouldn't exceed 1/2 that of the preutterance, and definitely should not fall outside of the fixed area, otherwise you may encounter rendering errors.
All of this is likely much easier to see visually, so let's look at a few different samples and see what they should look like.
Configuring Your Voicebank
The visual difference between vowels and consonants is usually pretty clear; the vowel is going to have a much larger amplitude in the waveform and several layers of stable frequencies in the spectrogram.
To edit any parameter, simply click and drag it on the visual editor. To play the entire sample between the offset and cutoff, hit SPACEBAR. To play back a portion of the sample between two parameters, right click on it.
For all CVs, the offset will always go at the start of the consonant, and is what we'll position first, since all other values will get moved along with it.
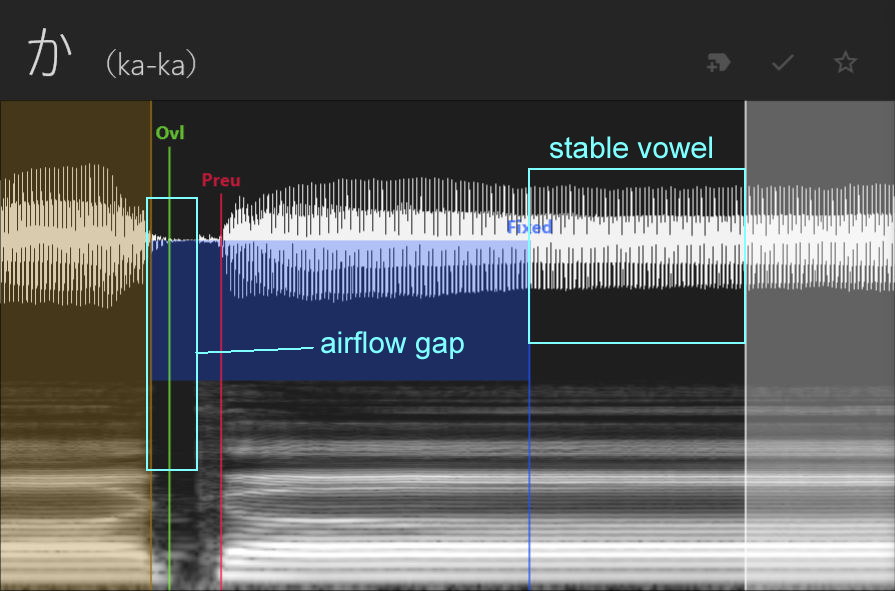
Additionally, we want the unfixed area to contain a stable section of the vowel to ensure that it will get stretched or looped smoothly by the resampler. Therefore, we want to place the fixed area and cutoff in such way that the space between them is stable.
Now let's talk about how to treat specific types of consonants.
Plosives are a set of consonants that includes [k, g, t, d, p, b]. These consonants will have a break in airflow followed by a small release of air. Place the offset at the start of the gap, the preutterance at the end of the release, and the overlap inside the gap before the release. This will preserve the break in airflow necessary for these consonants to sound correct.
Fricatives are the "hissy" sounding consonants, which here includes [s, sh, z, h, f, v]. For these, the offset goes at the start of the consonant, and the preutterance at the end of the consonant. The overlap should be about 1/4 to 1/3 the length of the preutterance; look for the place where the waveform changes shape towards the beginning of the consonant, if one exists.

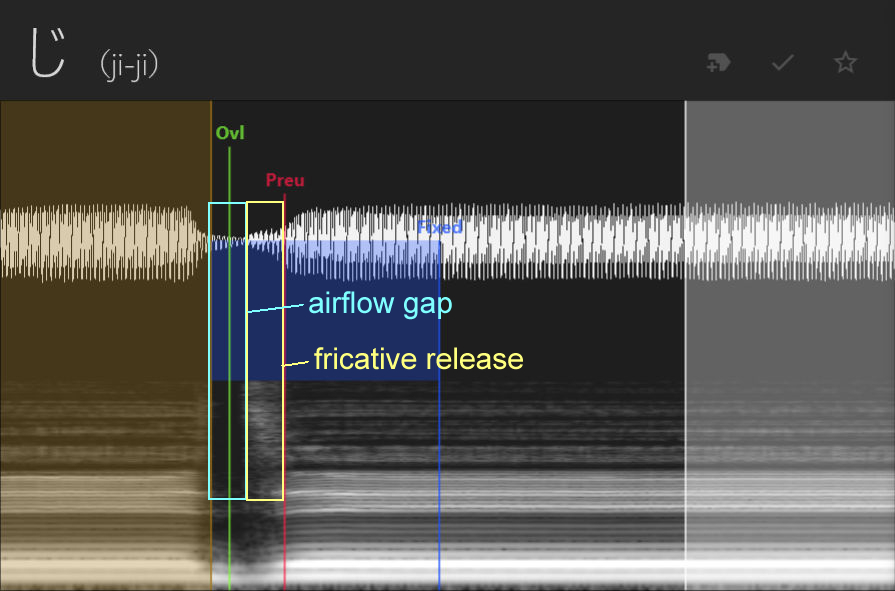
Affricates are kind of like a combination of a plosive and fricative, because they start with a break in airflow but release with a hissy sound. These include [j, ch, ts]. For a CV voicebank, we'll treat them the same as a plosive, with the offset at the beginning of the gap, the preutterance at the end of the release, and the overlap inside the gap before the release, but note that for CVVC voicebanks they're handled slightly differently if you want to convert this voicebank later.
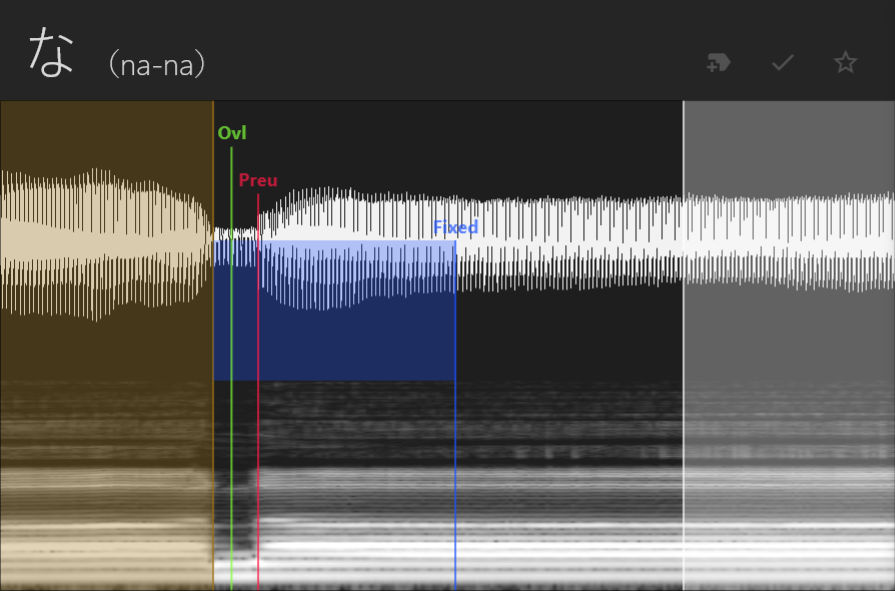
Nasals, [m, n], are similar to fricatives in terms of how they're oto'd; the offset goes at the beginning, the preutterance goes at the end, and the overlap should be about 1/4 to 1/3 the length of the preutterance.
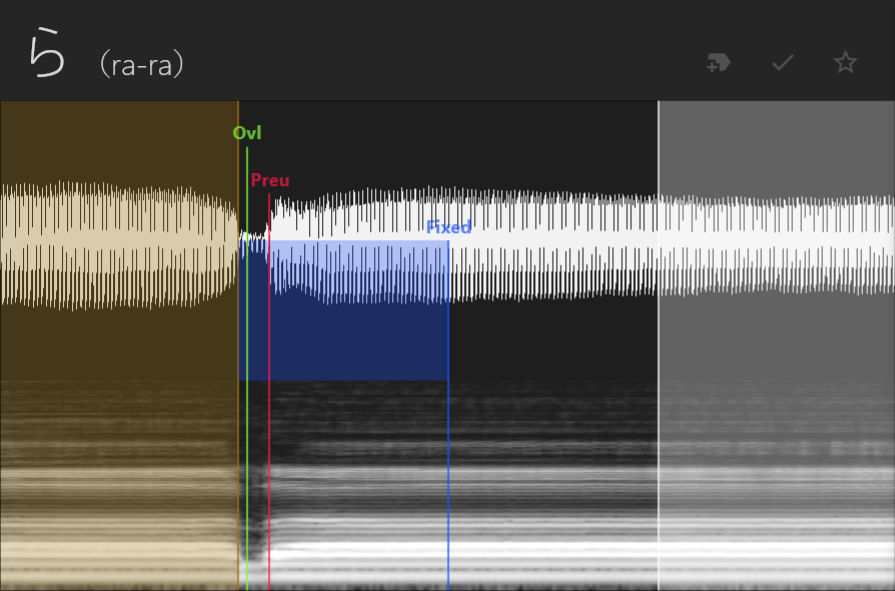
Taps, in this case only [r], are similar to fricatives and nasals, but are quite short, so you might not have much area to work with. Try to keep the overlap no more than half of the preutterance.
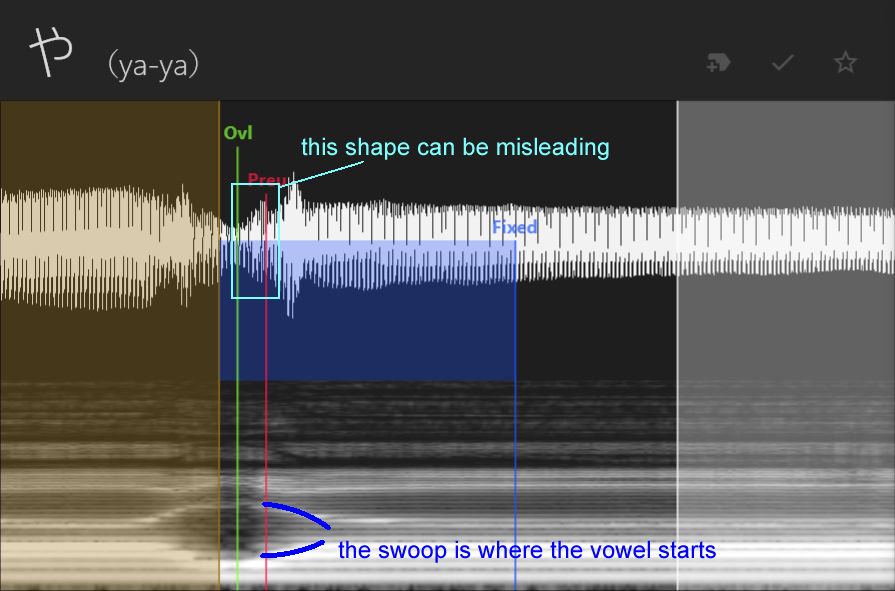
Last but not least for single consonants, we have the semivowels, [y, w]. For these, it can be a little tricky to see in the waveform where exactly they end, but its more obvious in the spectrogram; look for the "swoop" shape. Place the offset at the beginning of the "flat" area and the preutterance right before the swoop. The overlap should go in the flat area.
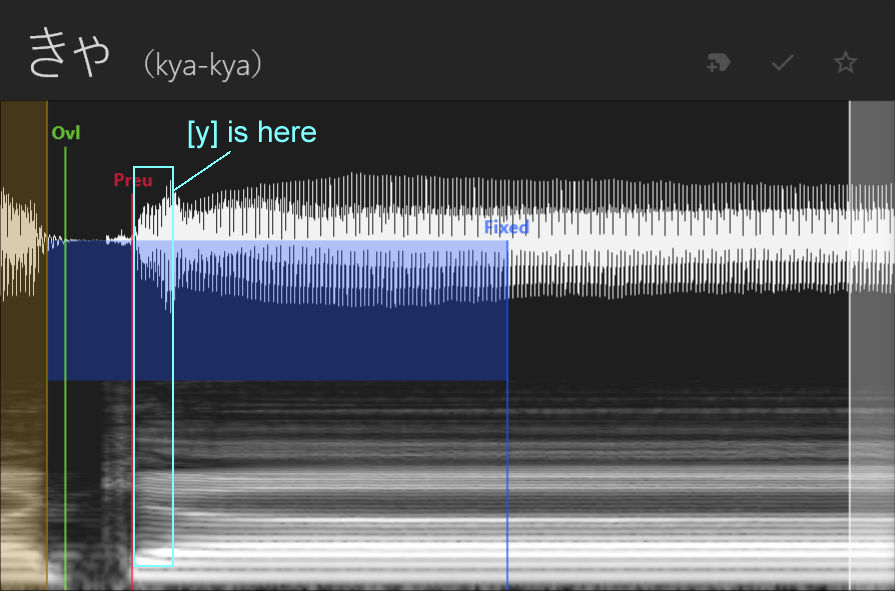
For the samples starting with [Cy], those being [ky, gy, ny, hy, by, py, my, ry], we'll treat the [y] as if its part of the vowel. Thus, we'll put the offset, preutterance, and overlap where we would if it was any other CV starting with that consonant, and we'll make sure that any of the [y] sound is captured within the fixed area.
Finally, let's have a look at the vowels [a, i, u, e, o] and the syllabic consonant [n]. For these, our goal is to try to imitate how one vowel would transition into another, so we'll put the offset at the very beginning of the vowel, the preutterance at the end of the vowel's fade-in, and the overlap about 1/4 to 1/3 the length of the preutterance. Treat the fixed area and cutoff as you would for any CV, and make sure the fixed area is larger than the preutterance.
After you've gone through every same in the voicebank and adjusted its parameters as necessary, hit CTRL+S to save your work. Since we enabled auto-exporting, this should save our oto.ini file automatically, but you can always double check it by opening it up in a text editor and making sure the parameter values have been updated.
Don't hestitate to go back and make edits to your oto, either, if anything sounds off while you're testing the voicebank.
If you want a more audio-visual reference for what the otoing process looks like, here's a video of me otoing the demo voicebank (sped up x4). I made some minor adjustments to the configs and corrected an alias error before release, but most of this is how it ended up in the final voicebank.
Now we're ready to use our voicebank for real!
☆ Using Your Voicebank ☆
UTAU Project Files
For this demonstration, I've prepared two premade USTs / USTXs you can try out your voicebank with; they do not have any quirks that you might find with other premade USTs which would make them difficult for testing. You can download them here if you haven't already.
UST (UTAU sequence text) is the filetype used by classic UTAU; USTX is the equivalent used by OpenUTAU. OpenUTAU can also import USTs, however, and both softwares can import MIDIs.
Inside the provided folder, you'll find several files, notably two .ust files and two .ustx files, one for each song.
Kaeru no Gasshou (Frog Chorus) is a short children's song. This UST is untuned and good to use for a quick test of the audio or the oto.
Sakura Sakura (Cherry Blossoms) is a folk song that's about 30 seconds long. This UST is tuned, and good for doing a more polished test render.
If your voicebank isn't singing in the provided USTs, or if the audio has a harshness to it, and you didn't already test it earlier, see here for testing and troubleshooting.
I've included the lyrics to both songs plus MIDI files if you want to practice making your own USTs (I will cover this in-depth in a future tutorial). I've also included some example renders using the demo voicebank to give you an idea of what the songs should sound like, as well as the difference in sound between a CV voicebank and a CVVC voicebank.
I've also made some test renders using other premade USTs to give you an idea of how different tuning styles can effect how the voicebank sounds. The CV demo is using a UST made by ZettaSloooow for 'Tiger Rampage' by sasakure.UK, and the CVVC demo is using a UST made by Anemone for 'No Logic' by JimmyThumb-P.
All four of these demos were rendered in OpenUTAU with all expressions default and using moresampler as the resampler. The CV renders used the default phonemizer and the CVVC renders used the JA VCV & CVVC phonemizer.
Working In UTAU
Inside of UTAU, navigate to File(F) > Open(O) and find the UST file. Double click on it, or select it and hit Open. If you don't have the voicebank in the UST's data in your voice folder, it will open up the Project Configurations menu automatically. Like before, find the name of your voicebank in the dropdown menu. If this window doesn't pop up, you can go to Project(P) > Project Properties(R) to open it manually, or click on the voicebank name in the top left corner.
This window is also where you can set the flags, resampler, and wavtool, as were covered in Intro to UTAU. Leaving these as default is fine for testing, though you'll likely want to try out different combinations and find which one you feel gives you the best sound (which often won't be the default resampler).
If your voicebank is recorded at a higher pitch, such as in a typical feminine range, you'll likely want to transpose the notes up an octave, as they were made to work with a mid-ranged male singer. To do this in classic UTAU, hit CTRL+A to select all the notes, then navigate to Edit(E) > Move Region By Number(M), enter 12 into the box that pops up, and click OK. Now the notes will be in a better range for a typical female or higher-voiced UTAU.
Select the notes of the UST you want to play, or hit CTRL+A to select everything, then hit the play button in the top bar or SPACEBAR on your keyboard to render it and listen to the playback. If you've done everything correctly up until this point, it should sing the song with no problems.
Working In OpenUTAU
Inside of OpenUTAU, navigate to File > Open, and find the USTX file. Double click on it, or select it and hit Open. To select your voicebank, you'll first want to make sure that OpenUTAU is also looking in your UTAU voice folder for voicebanks. If this is set up correctly, the name of your voicebank should show up in the singer dropdown menu. If you want to change the render settings, click the gear icon, but as before, using the default resampler (in this case, WORLDLINE-R) is usually fine for testing, but may not sound as good for your voicebank as other resamplers.
Since this is a CV UST and we're using a CV voicebank, we shouldn't need to change the phonemizer, but if you want to select one just to make a habit of it, I'd recommend the JA VCV & CVVC phonemizer, since it's pretty universal, especially if you plan to add in either the initial CVs or the VCs and VVs to the voicebank later on.
If your voicebank is recorded at a higher pitch, such as in a typical feminine range, you'll likely want to transpose the notes up an octave, as they were made to work with a mid-ranged male singer. To do this in OpenUTAU, hit CTRL+A to select all the notes, then navigate to Batch Edits > Move an octave up. Now the notes will be in a better range for a typical female or higher-voiced UTAU.
Hit the play button at the top, or SPACEBAR on your keyboard, to play the UST. It may pause to render more of the track if it hasn't fully rendered before you hit play. Once again, if you've done everything correctly, it should sing without issue.
Common Problem with Using Premade USTs
If you load a UST and it's not playing, and you've already verified that your voicebank works correctly on the demo USTs, this almost certainly has to do with lyric input. Your voicebank is a Japanese CV voicebank that is aliased with kana characters. If you try to use it with a UST that is built for a different type of voicebank, it will not work correctly, because the lyric input must match the sample aliasing. This means it will not work correctly with USTs that are made for:
- VCV voicebanks
- CVVC voicebanks
- Voicebanks with romaji aliasing
- Voicebanks with alias suffixes
Because the samples the UST is telling UTAU to look for do not exist in your voicebank.

In OpenUTAU, this is usually a pretty easy fix, because there are built-in conversion tools under Batch Edits > Lyrics on the piano roll window. If the problem is that it's made for CVVC, you can usually just delete the VC notes and extend the CVs to fill the gap. Reading romaji lyric input is also not a problem if using the JA VCV & CVVC phonemizer.
If Batch Edits > Lyrics > Remove Tone Suffix doesn't work for cleaning up suffixes in the lyrics, you can go to Batch Edits > Lyrics > General lyrics replacement, type in the suffix you want to remove in the Before box, and hit Apply.
In UTAU, there is unfortunately no such easy fix already in the software, but there is a plugin we can use instead. Iroiro2 is a plugin with a lot of useful features, including lyric conversion. After you've downloaded and extracted the files into a subfolder within UTAU/plugins, open the UST, select all the notes, run the plugin, and select the conversion options you want to apply.
☆ Finishing and Distribution ☆
This step is completely optional — it's perfectly fine to make voicebanks you don't intend to release to the public, whether keeping them for personal use only or only distributing them privately to friends. However, most voicebank developers do plan for public releases, so it's good to know how to go about it.
File Cleanup
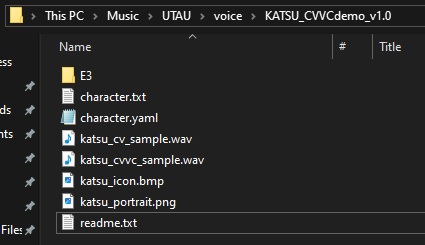
First, let's clean up our files. Throughout the configuration and testing process, we've likely ended up with a lot of files sitting in our voicebank that will bloat its size when we try to share it with others.
For starters, we can delete the vLabeler project file and cache file since our voicebank is fully oto'd now. We can also delete the $read file if one has been generated; this just tells UTAU that the voicebank has been opened before.
Next, inside of the folder with all of our audio files in it, we can delete all of the .frq, .llsm, and other such frequency files that may have been generated from voicebank usage or testing. Basically, you can safely delete any file in here besides the .wav files and the oto.ini.
Note: Depending on the resamplers you've been using, you may have a file in here named desc.mrq; this is fine to leave in the voicebank, as its storing sample frequency information in a single file rather than many separate files. It doesn't take up a lot of space and can also be converted to other frequency formats. If you have edited any of your frequency files and saved that information to the desc.mrq, you'll definitely want to leave it in there so that other users won't encounter the same frequency errors.
Voicebank Details
If you're at the point where you want to share your voicebank with others, you likely have made a character to go along with it, or at the very least a name you want to distribute it under. As such, we can rename our voicebank folder to reflect the name of the character, specific voicebank, and (optionally) version number, for example [CharacterName]_jpn_v1.0.
Next, let's render a short segment of a UST to function as our audio sample. This isn't required, but many users want to hear an example of what the voicebank sounds like in a raw render — that is, without any mixing or backing instrumental — so that's the purpose this audio file serves. Try to keep this no longer than about 30 seconds, and shorter is better.
You theoretically can use any song you want, but it's better to stick to things you know you have permission to use, including USTs made by other people. As such, I tend to stick to short, public domain songs rendered from USTs I've made myself, such as the demo USTs we used to test the voicebank. You have my permission to use them for your sample if you would like.
Export the .wav file from either UTAU or OpenUTAU and move it into the root folder of your voicebank. Name it something like sample.wav. This can be named anything, but must be a .wav file.
It's also common for voicebanks to come with an illustration of the character, or at the very least some image that will serve as the voicebank icon, though again this isn't required.
The voicebank icon must be 100 x 100 pixels, named something like icon.bmp, and placed inside the root folder. This can be named anything, but must be a .bmp file.
You can also include a full body illustration, reference sheet, or any other visuals you want; it's common to place these in a subfolder in your voicebank labeled something like art. Remember, though, the assumption of the user will likely be that if it is packaged along with the voicebank that they have permission to use it along with the voice, so don't include any art you don't want other people to use.
If you want to have a full body character portrait to display on the OpenUTAU piano roll, make sure the drawing has a transparent background and place it in either the root folder or a subfolder. Then, open the Singers window in OpenUTAU, load your voicebank, click on the gear icon next to location, and select Set Portrait to find the image. If the character icon isn't showing up in OpenUTAU, you can set it from this dropdown menu as well.
With these things made (or not), we can finish filling out the character.txt. The format for character.txt is like this:
name=Character Name
version=1.0
author=Name of the Developer
voice=Name of the Voice Provider
image=icon.bmp
sample=sample.wav
web=https://crouton.net/
All of these fields are optional to include.
The format for character.yaml, as used by OpenUTAU, is quite similar. All of these can be set within the Singers window, but here's what it looks like in text format:
singer_type: utau
text_file_encoding: shift_jis
image: icon.bmp
portrait: portrait.png
portrait_opacity: 0.67
portrait_height: 0
default_phonemizer: OpenUtau.Core.DefaultPhonemizer
Note the formatting differences between this and character.txt; character.yaml uses : after each field instead of =.
Lastly, let's talk about the readme.txt. This file should ideally contain information on how to credit and contact you, the author, as well as relevant technical information such as the type of voicebank, language support, recording pitch, reclist used (if non-standard), and any special features the voicebank has. It can also contain character information, such as a short character bio.
Perhaps most importantly, however, this is where you should put your Terms of Use (TOU). Essentially, this is an informal contract between you and the user that outlines what is and isn't allowed to be done with the voicebank itself and any associated assets like character art. These are difficult to have any sort of legal enforcement outside the realm of unauthorized commercial usage, but most users will be respectful of voicebank developers' requests.
My friend KLAD has a really great TOU Generator on his website that you can use if you don't know where to start. You can also reference mine if you want to see a slightly different format.
Putting it altogether, we should have a root folder that looks something like this:
And our voicebank's in-engine profiles will look like this:
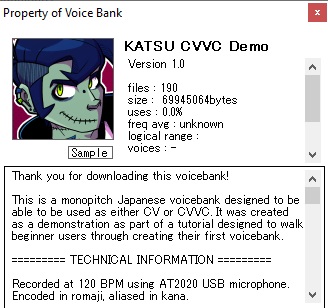
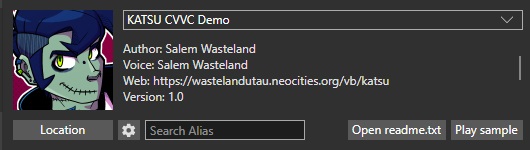
Pressing the "sample" button in either software should play the audio sample we specified in character.txt. If none is specified, it will play a random .wav file from the voicebank.
Packaging
With all of this set up, our voicebank is now ready to be set free into the world! Well, almost.
First, we need to package it. We've already included everything we need, so this is as simple as right clicking on the root folder within the voice folder and compressing it to either a .zip or a .rar file.
Next, upload the compressed file to some kind of filesharing service, like Google Drive, Mega.nz, Bowlroll, Mediafire, Dropbox, or any other one of these free-to-use services. This will provide you with a link you can give to anyone who wants to download your voicebank. My only recommendation here is to try to avoid the kind of free filesharing sites that will give you and others 5000 viruses, usually proportional to how many advertizements its flashing at you.
Distribution
How you go about it from here on out is up to you.
You can make a demo song/cover, or demo reel of multiple songs/covers, showing off your UTAU's capabilities, which you can upload to Youtube or Soundcloud of where ever else.
You can create pages for your UTAU on different voicebank databases, like the UTAU wiki, for example, so that people searching for voicebanks can potentially find it. You can even make your own webpage for your UTAU, whether coded from scratch like mine are here on Neocities or made by using a free website builder. Then, you can link this in the "web" section of the character.txt.
You can also simply post about your UTAU on your social media accounts, or advertize it on forums and discords that allow for self-promotion — though, remember to be curtious to other users; if you're posting in a social space, it's a little rude to just spam your promos and dip.
These are just a few ideas; a lot of the time, word about voicebanks spreads by word-of-mouth or by chance, so just keep doing your thing and eventually other people will start to take notice.
☆ Next Steps ☆
Thanks for reading this walkthrough! It's a bit of a long one, but I hope you've come away from it with a better understanding of how UTAU voicebanks are made and, if you've followed along with me, succesfully created a voicebank of your own.
Using the foundation of everything we've covered here, you can go on to create many more voicebanks, and you can always come back and reference this page if you need a refresher on how something works.
Once you feel comfortable recording, configuring, and working with monopitch Japanese CV voicebanks, you can move on to creating and using more complex voicebank types, such as CVVC voicebanks, VCV voicebanks, multipitch voicebanks, and even branch into more complex languages like English.
I'm also working on some more in-depth tutorials on recording and otoing strategies aimed at intermediate and advanced users, as well as one on UST creation and other troubleshooting guides. I will link those here when they're done.
If you've successfully rendered, mixed, and uploaded a demo of a voicebank created using this walkthrough and you want to include your UTAU in my voicebank directory, see here.
If you need help with anything else, or just want a beginner-friendly place to chat about vocal synth stuff, I recommend checking out UtaForum or the St. Defoko's Discord Server. I'm on both of these.
Happy UTAU-ing ✌️