☢ Introduction to UTAU ☢
This resource is an explanation of what UTAU is and how to install both Classic UTAU and OpenUTAU. It will also cover how to find and install voicebanks, as well as the basics of setting up UTAU project files. It is aimed at absolute beginners and assumes no prior knowledge.
Walkthrough tutorial on creating one's first is voicebank coming soon!
☆ What is UTAU? ☆
UTAU is a Japanese singing synthesizer application created by Ameya/Ayame (飴屋/菖蒲) in 2008 (Wikipedia). A singing sythesizer is a kind of virtual instrument meant to replicate human singing vocals. These can be broadly sorted in three categories: those that are completely artificial with no human input, those that generate audio using a machine learning model, and those that sample from audio recordings. UTAU is the third kind.
Unlike other major singing synthesis softwards, like VOCALOID, Synthesizer V, and CeVIO, UTAU is not only completely free to use, but also allows users to make their own synthesizers. A few competitors have shown up over the years, like Niaoniao and DeepVocal, but so far none have been able to match the quality and flexibility that UTAU provides.
That being said, the software does have its limitations, and there haven't been any major updates since 2013. There are, however, many tools and plugins available to expand and improve software capabilities, and there is an open-source clone and improvement project called OpenUTAU currently in development, which we will also be covering here.
Part of the appeal is that the voices are often represented by original characters called UTAUloids (or just UTAUs), which adds another layer to the creative process of developing them. If you're reading this, there's a good chance you've at least heard of the more prolific UTAUloids like Teto Kasane, who has been included in official VOCALOID media and recently recieved a Synth V voicebank, Momo Momone, who sang the nyan cat song, or Defoko (also known as Uta Utane), the default voice of the software.
Using UTAU you can...
- Create libraries of audio files called voicebanks
- Share your voicebanks online and download ones created by other people
- Create covers of songs you like
- Create vocal tracks for original music
- Design original characters to represent your voicebanks
- Use various methods to manipulate the sound of a voicebank, even beyond what humans can do
- Use and create plugins to expand the capabilities of the software
- Interact with a huge, diverse community of creators from all around the world!
How Voice Synthesis Works
Voicebanks are libraries of sound files created by either generating audio frequencies or by recording a human vocalist. These voicebanks can then be sampled and rendered by an engine/software/application in order to synthesize vocals.
Some of them function by sampling entire words and phrases, but these are often for more specialized purposes that only need a set vocabulary. For a synthesizer that is intended to be able to say/sing anything in a given language, it is almost always more efficient to break the language down into its phonetic components, meaning that speech sounds (phones) are sampled in small groups and stitched together by the software to form larger words and phrases.
This doesn't mean that every phone exists in a separate recording, however; for more natural synthesis, sequences of phones are usually extracted from longer utterance strings, and configured so that the end of one sample blends as smoothly as possible with the beginning of the next. As we'll go over later, there are a few different methods that UTAU voicebanks use in order to do this effectively.
Some engines have built-in dictionaries that will convert words written in a language's orthography (spelling) into a set phonetic output, often with some way to "guess" the pronunciation of words it doesn't "know". Others require a user to manually select the phonetic samples needed and will not recognize orthographic input — this is the kind that UTAU is. OpenUTAU, however, does allow orthographic input for languages which have supported phonemizers, and still allows for adjustment of the phones it selects for each word.
Sampling From Other Sources
While your UTAU doesn't have to be voiced and designed by you specifically, you need to have permission for any asset you use for it, be it audio or visual. Using audio in UTAU without explicit consent of the owner/vocalist is a violation of UTAU's terms of use, AKA what you inherently agree to by using the software. Doing so could create potential legal trouble for both you and for the developer. This also includes sampling and porting other singing synths into UTAU. All of this holds true even if you do not distribute the voicebank.
Open-source, free-use, or license-free audio is generally fine to use, but always double check the usage agreement if one exists. When in doubt, contact the developer.
My own feelings on this are irrelevant, but it would be irresponsible for me not to issue this warning. I also want to add that creating a voicebank out of samples unintended for singing synth is vastly more difficult than just doing you own work.
Similarly, using artwork for your voicebank that was not made by or for you is at best disrespectful to the artist, and at worst a violation of copyright. This includes tracing or copying another artist's work, even if you change the details of the character. This also generally includes "AI" generated images, such as those made with Midjourney, as the majority of these models were trained on stolen assets.
I'm not trying to scare anybody off here, these are just important things to know before making and distributing voicebanks. As long as your UTAU is 100% yours, you don't have anything to worry about. You can use audio and artwork provided by other people as long as they've given you permission.
☢ Installing UTAU on Windows ☢
This guide is for installing on Windows, using Windows 10 specifically. UTAU should work on Windows 7 or later with no issues.
Mac users, see this tutorial by MystSaphyr on installing UTAU Synth for MacOS.
OpenUTAU works on Windows, MacOS, and Linux, with guides on its official git page for each OS in addition to what I'll be covering here.
☆ Setting System Locale (NOT OPTIONAL) ☆
It is very important that you do this before installing UTAU. If you don't, UTAU won't be able to read or display Japanese characters properly, and you'll run into a lot of problems while trying to use it.
Locale is not the same as your computer's language or region; those settings do not have to be changed. Changing locale should not affect anything major on your computer or cause you any problems.
Yes, you have to do this in order for UTAU to work correctly. No, you can't change it back after installation if you want to continue using the software.
FOR OPENUTAU ONLY: You do not have to set your locale in order to use OpenUTAU, but you may still want to if you have any plans to use the old software, or if you want to use Defoko.
Lastly, make sure you're on an account with administrative privledges, and be prepaired to restart your computer afterwards.
Instructions
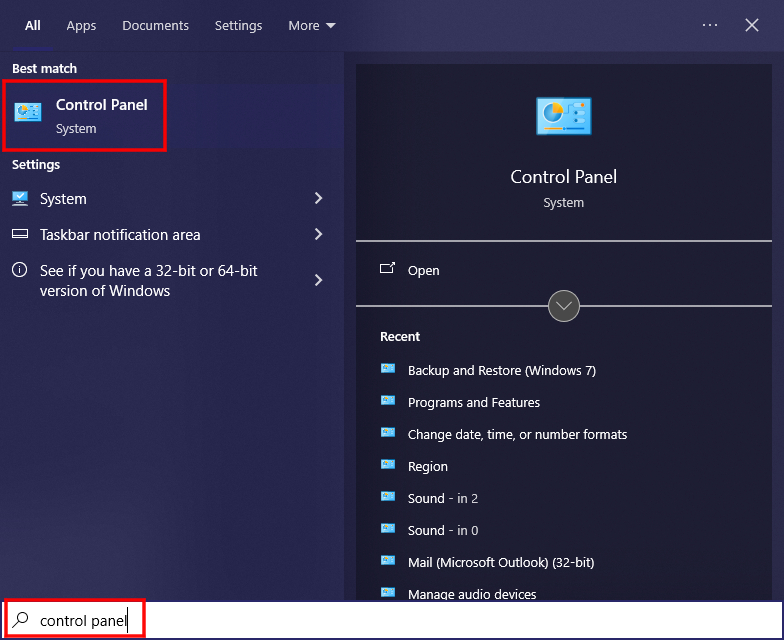
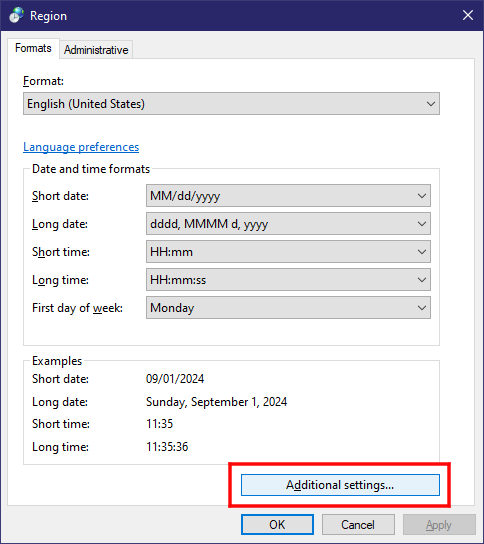
Step 1. Open the Start menu and type in Control Panel (the search bar should appear automatically).
Step 2. When the name and icon appear, open the Control Panel application.
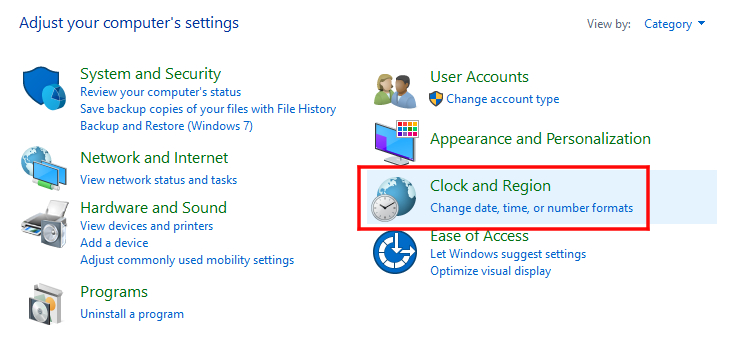
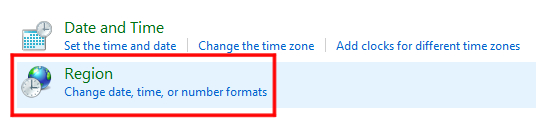
Step 3. Navigate to Clock and Region > Region.
Step 4. In the window that pops up, click on the button that says Additional Settings.
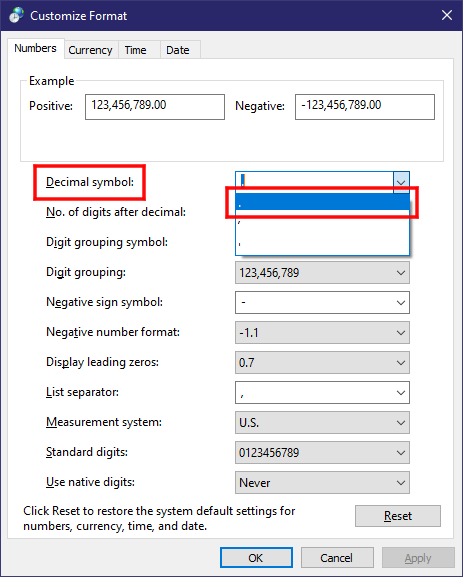
Step 5. In the Customize Format window that pops up, make sure the symbol next to Decimal Settings is a period. If it isn't, select the period [.] from the dropdown menu.
Step 6. Click OK.
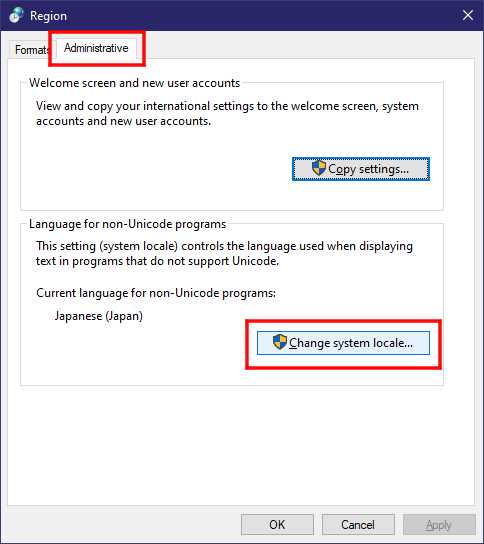
Step 7. Back in the Region window, click on the tab labled Administrative.
Step 8. Click on the button labeled Change System Locale.
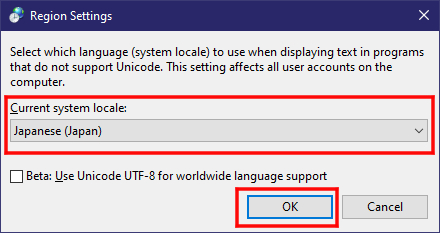
Step 9. In the Region Settings window that pops up, select Japanese (Japan) from the dropdown menu.
Step 10. Click OK, and accept the prompt to restart your computer.
☆ Installing Classic UTAU ☆
If you skipped to here before reading the previous section on setting system locale, go back and follow those instructions first. This is the number one mistake new users make when trying to use the software for the first time.
Instructions
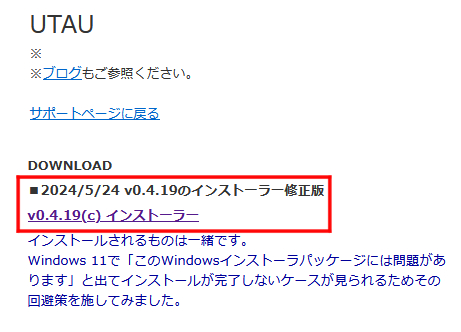
Step 1. Navigate to utau2008.xrea.jp. Select the first link under DOWNLOAD labeled v0.4.19(c) インストーラー (v0.4.19(c) installer). This is the most recent version of UTAU.
Step 2. Download the .zip file wherever you like.
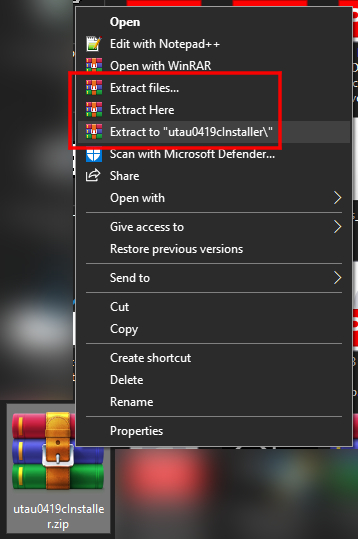
Step 3. Navigate to where the file was downloaded to, and right click on it to extract its contents wherever is convenient. It should only contain a single .exe file.
If you're not familiar with file compression and you don't see an option to unzip the file already, you'll need to install an application like winrar or winzip to do this.
Step 4. Once the .exe is extracted, double click on it to run the installation wizard.
Step 5. The installer is in Japanese, and the buttons at the bottom read Cancel, Back (B), and Next (N). Click the Next (N) button once.
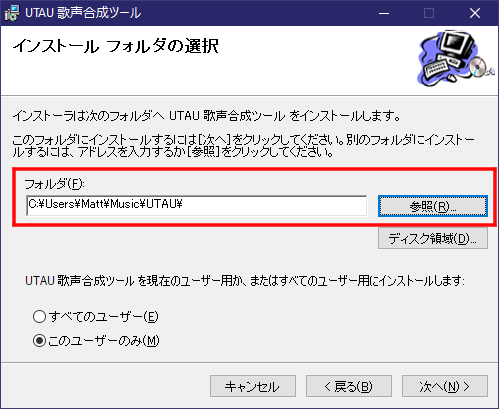
Step 6. The second page of the installer is asking you where you would like to install UTAU. By default, it will be set to your Program Files, but due to newer versions of Windows having restrictions on file permissions in this folder, you may want to instead change this to be somewhere like your Music or Documents folder.
Be sure that the new file path ends in \UTAU\; type it in if it is not already there. This ensures that a folder of this name will be created in the desired location, e.g. C:\Users\[user]\Music\UTAU\
The option at the bottom is asking whether you want to install for all users (E) or only the current user (M).
Once all of these settings are how you want them, click Next (N).
Step 7. Click Next (N) again, and the installation should begin. This should only take a few minutes at most.
Step 8. When the installation finishes, click the button on the bottom right which now reads Close (C) to close the installer.
Checking Your Installation
If you followed all steps correctly, you should now have a folder labeled UTAU wherever you installed it to. Inside of this folder, there should be three subfolders labeled plugins, res, and voice, some .txt and .dll files, and three .exe files: resampler.exe, wavtool.exe, and utau.exe. The latter is the main application.
Inside of voice, you should find a subfolder labeled uta. This is Defoko's voicebank. Inside, there should be a bunch of .wav and .frq files with hiragana names. If the filenames are not hiragana but rather a bunch of garbage characters, it means you did not set your locale correctly, and will need to completely uninstall UTAU and restart the process from the first section.
Setting Interface to English
If your computer's language is set to English, you should not have to do this, but just in case it's in Japanese when you open it up, here's how to change it.
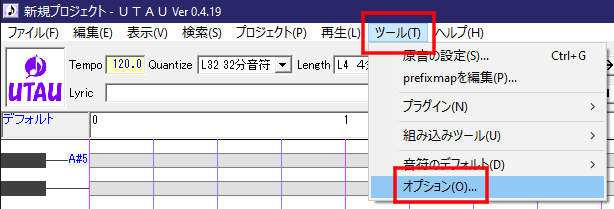
Step 1. Find ツール(T) (tools) on the toolbar.
Step 2. In the submenu, go to オプション(O) (options).
Step 3. In the options menu, click on the second subtab of the first page labled その他 (other).
Step 4. Click the last checkbox on the page labled インターフェース言語を強制する (force interface language).
Step 5. Select en from the dropdown menu, click OK, and restart UTAU.
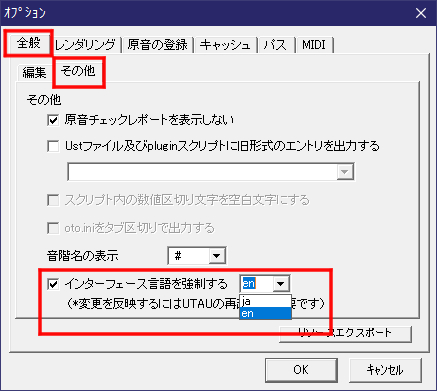
Now, next time you open it, everything should be in English.
☆ Installing OpenUTAU ☆
Instructions
Step 1. Navigate to openutau.com. Click on the download button that goes with your operating system (when in doubt, try Windows x64).
Step 2. Download the .zip file wherever you like.
Step 3. Navigate to where the file was downloaded to, and right click on it to extract its contents wherever is convenient. It should contain several files; I highly recommend extracting them to their own folder, such as C:\Users\[user]\Documents\OpenUTAU\.
If you're not familiar with file compression and you don't see an option to unzip the file already, you'll need to install an application like winrar or winzip to do this.
Step 4. Once the contents are extracted, find OpenUtau.exe and double click to launch it. The software will automatically check for updates when it opens.
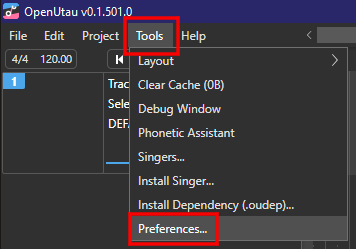
User Preferences
By navigating to Tools > Preferences... you can change a variety of software settings. To change the interface language and colour theme, scroll down to the Appearance section.
☆ Japanese IME (Optional) ☆
A Japanese Input Method Editor, or IME is simply a way to allow for typing Japanese characters with a non-native keyboard. This isn't strictly necessary for using UTAU, but it will make your life a hell of a lot easier, so I highly recommend it.
You can follow this brief tutorial for instructions on how to set it up and use it. It should be fairly straightforward.
☢ Voicebanks ☢
☆ What are Voicebanks? ☆
Voicebank, or 音源 (ongen) in Japanese, is a catchall term for the library of sound files that a synth engine will sample from in order to render vocals. A given UTAU character, or UTAUloid, will have one or more voicebanks associated with it.
There are also derivative UTAUloids, which are ones that are derived from existing characters using non-standard render settings, such as genderbends like Ted Kasane, who is a derivative of Teto rendered to sound more masculine. Some UTAU have officially recognized derivatives, and others will typically outline their policy on derivative creation in their Terms of Use (TOU) / End User License Agreement (EULA).
The TOU for an UTAU are usually found in the readme file of the voicebank, and cover things such as commercial usage and content permissions. It's a good idea to read these before using a particular voicebank to avoid issues.
☆ Voicebank Classification ☆
Language Support
When categorizing voicebanks, the most obvious thing to look at is language support. While a lot of voicebanks will offer some amount of multilingual compatibility, and you can brute force one to sing just about anything, it's often easier to look for a voicebank that's designed specifically for the language you need.
As vocal synth fans, this will commonly be Japanese, which is one of the easier languages to work with since it's not very phonologically complex, the methodology is really standardized, and it's what UTAU was built for.
Using voicebanks for other languages can be more complicated, especially for complex languages like English. While some set methodologies exist for other languages, there is a lot less standardization, so they can be more difficult to work with and more difficult to create. While classic UTAU requires manual phonetic transcription, this is less of an issue for OpenUTAU thanks to the existance of Phonemizers, but even these likely won't be able to fully capture all the phonetic nuances.
Japanese voicebanks will typically indicate the characters used in the voicebank's aliases (what is used to write lyrics in the software) and encoding (how the sound files are named). These will either be in kana (often strictly hiragana), which means they're written using Japanese characters, or romaji, which means they're written using the Latin alphabet (same as English). Kana is most common for aliasing, but while it's definitely useful to learn how to read it, there are romaji ↔ hiragana conversion plugins you can use, and a built in conversion feature in OpenUTAU.
Voicebank Labels
There are three overarching kinds of labels you'll see applied to voicebanks: CV, VCV, and CVVC. The C's stand for consonant, the V's stand for vowel, and the order of them indicates the main types of voice samples the voicebank contains.
CV voicebanks, called 単独音 (tandoku-on) in Japanese, are the smallest and most basic type of voicebank. They consist primarily of consonant-vowel pairs called diphones, and are typically the easiest to use. However, they won't give you the most naturalistic vocals, and are often described as sounding "choppy" and "robotic" — but that doesn't mean they are inherently poor quality or not worth using. You may also see voicebanks labeled as れんたん (rentan), but this is just a specific recording method for CV.
Next we have VCV voicebanks, or 連続音 (renzoku-on). These are the largest voicebank type, and contain not only every CV, but also every vowel + diphone combination, hence the name. These function by blending the leading vowel of a sample with the ending vowel of the previous sample, creating a more natural transition between notes.
And finally we have CVVC voicebanks. These may also be labeled as CVC, VCCV, or pseudo-VCV, but fundamentally these are all just different techniques for the same voicebank type, that being one which is built on both CV samples and VC samples. For many languages, the VCs are necessary to capture the final consonant of a given syllable, but for languages with open syllables like those in Japanese, a VC can act as the transition point, much like the leading vowel of a VCV. You can think of it like a VCV sample split in half and using the consonant as the blending point.
Another term you will frequently come across is multipitch (as compared to monopitch). Sometimes these are labeled something like dipitch, tripitch, powerscale, or キレ (kire), but these are all different classifications of the same idea. Multipitch works by recording the same samples in, well, multiple pitches, and configuring the voicebank in such a way so that when a sample falls on a specific musical note, the voicebank will render it from the sound file that corresponds with that pitch. Because a voicebank will sound clearer and more natural the closer the notes its singing are to the pitch it was recorded at, this can create more natural-sounding voicebanks overall and give the voicebank a wider ideal range.
Building off of this, we also have multiexpression voicebanks, which are recorded in more than one vocal style but can be rendered together in the software. These may or may not also be multipitch.
☆ Finding and Installing Voicebanks ☆
Voicebank Databases
There are lots of ways to find voicebanks you may want to use, and there are literally thousands of them out there. You may come across one by chance, such as from a song or cover you like, but there are also a few different databases you can browse or search:
- UTAU Wiki 2.0 (EN) — This is the one I recommend most for English speakers, because it's the easiest to search, and the page format is consistent and easy to navigate. Here, you can search for voicebanks that are labled with specific tags, such as voicebank type, range, language support, and country of origin. You can also browse the entire database alphabetically.
- UTAU Fandom Wiki (EN) — At time of writing, it's going through some remodeling, so the page format can be a bit inconsistent. It's probably the largest database, but not all of the pages have been kept up with over the years.
It's also unfortuantely part of Fandom.com so it's riddled with pop-ups and advertizements.Like Wiki 2.0, you can also search or browse voicebanks by specific tags. - UtaForum Showcase (EN) — This is the smallest database, and mostly used by forum regulars, but it's still a good way to find new voicebanks to use, especially if you're looking for more recent ones.
- UTAU Visual Archive (JP) — Large database of UTAU with visual references. You can browse specific categories based on character traits.
- UTAU DB (JP) — Nice search function (if you know Japanese), but not the best for general browsing.
- Vocaloid Database (EN) — Also covers producers and other synths, but there are lots of UTAU catalogued on this site as well.
If you already know what UTAU you want to use, however, it's usually just a matter of typing their name into a search engine. A good number of UTAU, such as mine, even have their own webpages, which may be more up-to-date than their wikis.
Downloading Voicebanks
For UTAU:
Once you've located the download link for the voicebank you want to use, you can open it up and download the file. UTAU voicebanks usually come in .zip or .rar files, but occasionally you might find one that's stored in an executable. For convenience, I usually download them directly into the voice folder within my UTAU program folder.
Next, I open up the file in winrar to see whether or not they zipped the entire folder, or if the voicebank contents are loose inside of it. If the entire folder is preserved, I right click the file and select Extract Here. If not, I select Extract to [filename].
After the voicebank folder is extracted, I open it up to make sure everything looks good inside of it. The root folder of the voicebank — that is, the one that is stored directly inside of the voice folder — should have at the very least two text files inside of it: character.txt and readme.txt. character.txt is the file that registers and labels the voicebank inside of UTAU. The root folder may also contain the .wav files and oto.ini (configuration file), or these may be found in one or more subfolders within the voicebank. There may also be other files or folders included, but don't worry about those for now.
If you open the main folder and see nothing but another folder inside of it, simply cut and paste the contents from this subfolder into the main one to make sure it'll be registered correctly by the software.
For OpenUTAU:
By default, OpenUTAU will have you install singers to the program by navigating to Tools > Install Singer... and selecting the voicebanks .zip or .rar file. OpenUTAU will then extract contents of the file itself into the folder labled Singers within the OpenUTAU program folder. Alternatively, you can follow the same method outlined above, but placing the voicebanks into this folder instead.
If you plan to use both softwares, there is an easy way of sharing voicebanks between them:
Step 1. Navigate to Tools > Preferences....
Step 2. In the preferences window, scroll down to the section labled Paths.
Step 3. Under Additional Singer Path click on the Select button and locate your UTAU voice folder.
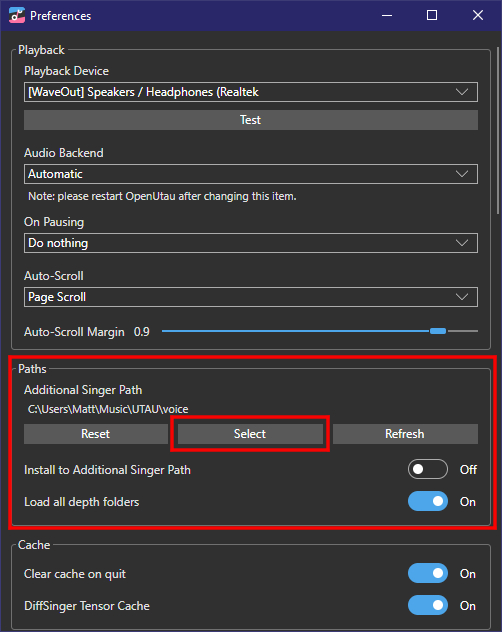
Now, all of the voicebanks you've set up for UTAU will be accessible in OpenUTAU, so you do not need to have two copies of every voicebank you want to use.
Loading Voicebanks
For UTAU:
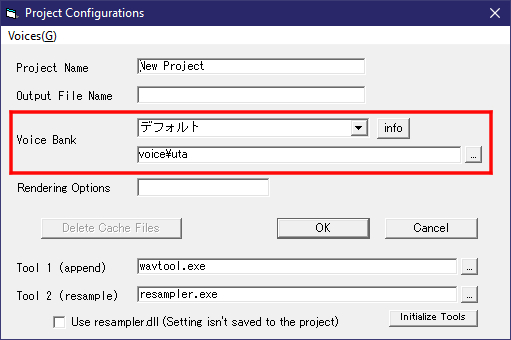
Inside of UTAU, you can change the voicebank selected by going to Project(P) > Project Property(R), which will pull up the Project Configurations window.
Alternatively, you can click on the voicebank name in the top left corner underneath the icon.
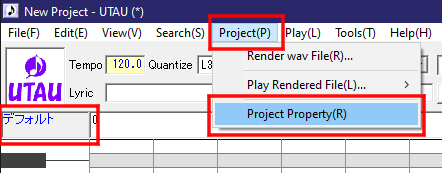
Here, you can either select the voicebank name from the dropdown menu labled Voice Bank, or click on the three dots to browse through your files yourself. Make sure you select the root folder of the voicebank, not any of the subfolders inside of it.
To view the voicebank's information, click on the info button in your project settings, or click on their icon in the top left corner. This usually includes a profile picture, voice sample, author credit, and any other information in the voicebank's readme.

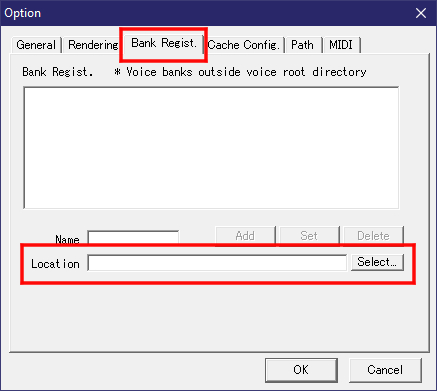
If you saved your voicebank elsewhere on your computer, or it just isn't showing up in the dropdown menu, you can register it into UTAU manually:
Step 1. Navigate to Tools(T) > Option(O), and click on the tab labeled Bank regist..
Step 2. Click on the Select... button, navigate to the root folder of the voicebank, and click Okay.
Step 3. If the name doesn't load automatically, type it into the box above the file path and click Add.
Step 4. Click Okay. Now, the voicebank should show up in your project settings.
For OpenUTAU:
OpenUTAU allows you to use multiple voicebanks within the same file. To change the voicebank of a given track, click on the button labled Select Singer (or the currently loaded voicebank's name) and find the voicebank you want to use in the dropdown menu.
To view information about all of the voicebanks you have installed, go to Tools > Singers.
In addition to the character.txt and readme.txt files, voicebanks set up for OpenUTAU may also have character.yaml files containing information specifically for OU, such as defining specific voice colours (expressions) and setting the default phonemizer.
☢ UTAU Interface & Settings ☢
☆ Interface Overview ☆
The last thing I want to cover in this guide is the software interface and general project settings.
The UTAU interface functions very similarly to other MIDI softwares. Here, I've labeled most of the general functions:
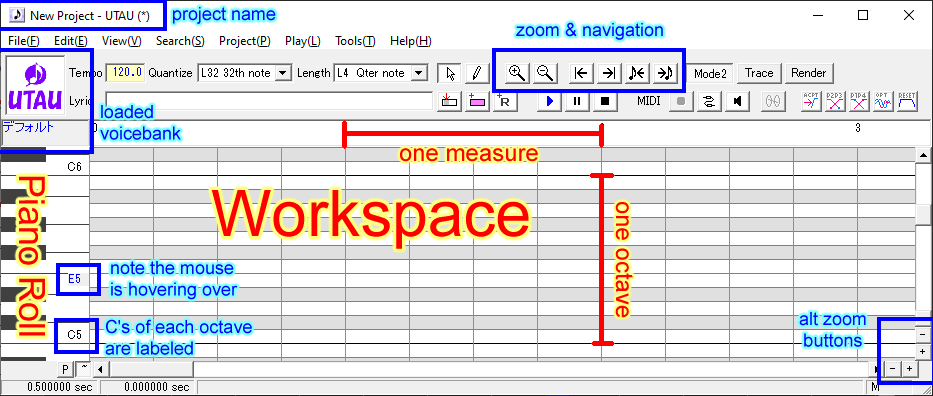
Hovering over most buttons will also tell you what they do.
As mentioned, clicking the voicebank name is a shortcut to the project settings. Clicking the voicebank icon will open the voicebank info.
☆ Project Settings ☆
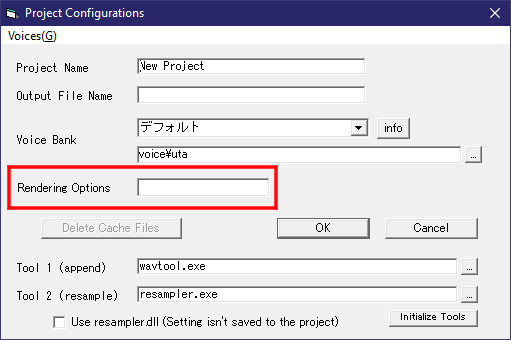
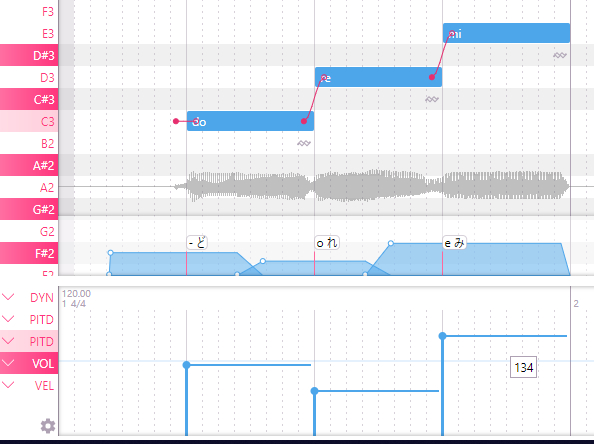
UTAU project files are called USTs, which stands for UTAU sequence text. To change the settings of the UST, we use the Project Configurations window, which will pop up on the prompt for creating a new file, or can otherwise be opened using the methods discussed previously.
The project name is usually the name of the song. This is not the same as the name of the UST file, which we choose upon saving like in any other software. Therefore, this isn't necessary to set, but it can help you stay organized if you're working with multiple USTs at once. The output file name is the name of the .wav file that will be rendered from the UST; it's not necessary to set this, as we can name it whatever we want when we go to render the file.
☆ Render Settings ☆
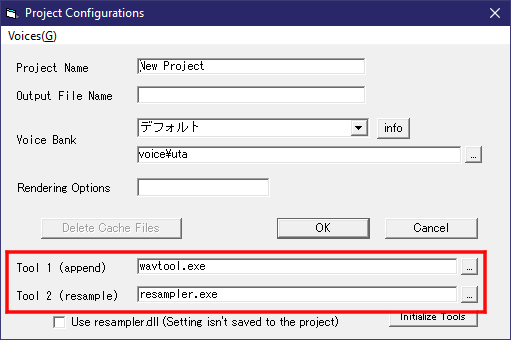
Resampler & Wavtool
The resampler is the executatable that actually performs the rendering process; it takes the samples included in a voicebank and, well, re-samples them based on the note settings. UTAU comes with a default resampler, but there are many others that can be downloaded and used. The wavtool handles the way the samples are strung together; most resamplers will work with the default wavtool, but not all of them are compatible with every wavtool and vice versa.
Each resampler functions slightly differently, so the resulting render will be different even for the same voicebank. A lot of voicebanks will list what resamplers they recommend in their readmes, but you may experiment with different ones until you get one you like the sound of. Here is a comprehensive list of resamplers and wavtools (archived), including download links and example renders.
I'm partial to moresampler for clean vocals (note that moresampler also needs to be set as the wavtool to function) and tn_fnds for "pitchless" vocals such as growls and whispers, but again, this is going to vary from voicebank to voicebank, and your preferences may differ from mine. I also periodically use TIPS and bkh01.
You can download your resamplers directly into your UTAU program file, or, as I do, keep them in a subfolder. If they are in a .zip or .rar, be sure to extract them.
To change the resampler in UTAU, open up the project settings and, next to Tool 2 (resample), either type in the name of the executable, e.g. TIPS.exe, or click on the ... button to locate the .exe yourself. Note that if your resampler is in a subfolder, you'll need to type in the local file path, e.g. resamplers\TIPS.exe. If, for whatever reason, it's not in your UTAU folder at all, you'll need to type in the entire file path, e.g. C:\Users\[user]\Documents\resamplers\TIPS.exe.
To change the wavtool, do the same but with Tool 1 (append).
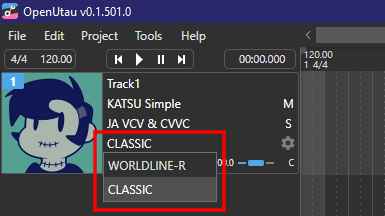
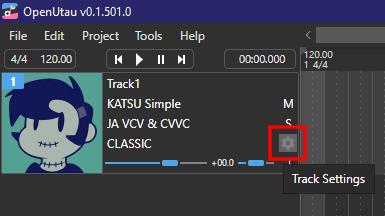
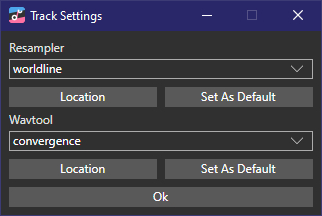
To change the resampler or wavtool in OpenUTAU, click the Select Renderer dropdown menu on the track settings and choose CLASSIC. Unlike UTAU, this will only change the resampler for this specific track rather than for the whole project.
Next, click the gear icon to select the specific resampler and wavtool you want to use for that track. You may have to navigate to their files directly by clicking Location. You can also set one of them as default.
UTAU Flags
Flags are specific render settings that are used to alter the sound of the samples, mostly through adjusting the frequencies and formant. To oversimplify a complex topic, frequency is the pitch at which a note is sung as well as all of the overtones that come together shape the sound. Formant referers to what region of frequencies is most intense. Flags are completely optional to use.
Some flags are universal, while others are resampler-specific. For a comprehensive list of flags and some resamplers, I highly recommend this resource by susrever (PDF download). Alternatively, here is a quick reference hosted on Tumblr.
Like resamplers, a lot of voicebanks will list their recommended flags in their readmes.
To apply flags to the entierty of UST, type them into the box next to Rendering Options in your project settings. The syntax should be X#Y#Z#, with the flag's name and value and no spaces between them, like g-5B30H20. The order of the flags doesn't matter, but note that flag names are case sensitive, meaning that an uppercase letter like G is different from a lowercase letter like g.
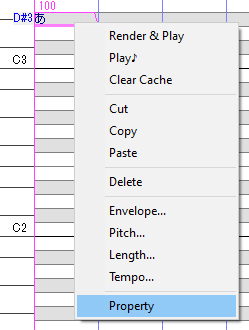
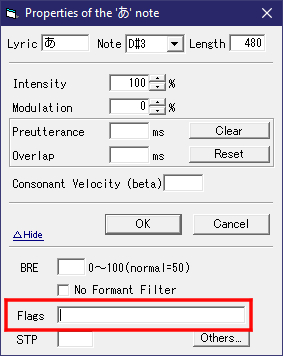
Alternatively, you can add flags to specific notes by selecting all of the notes you want to apply it to in the piano roll, right-clicking, going to Property, and typing them in the flag box of the note properties menu.
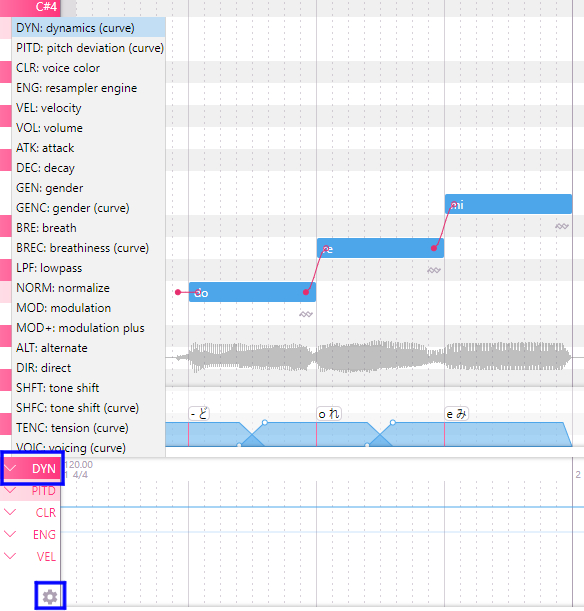
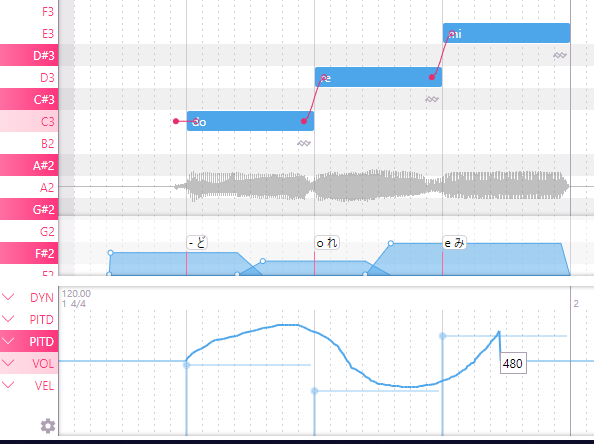
OpenUTAU Expressions
Expressions are OpenUTAU's equivalent to flags. They can be viewed and changed using the bottom section of the track editor.
To use UTAU flags that aren't already included in OpenUTAU, you can create new expressions and adjust them as needed for that flag. These settings will only apply to the current project. Note also that this will add this setting to the entire project not just the current track, which may cause rendering errors if you are using different resamplers.
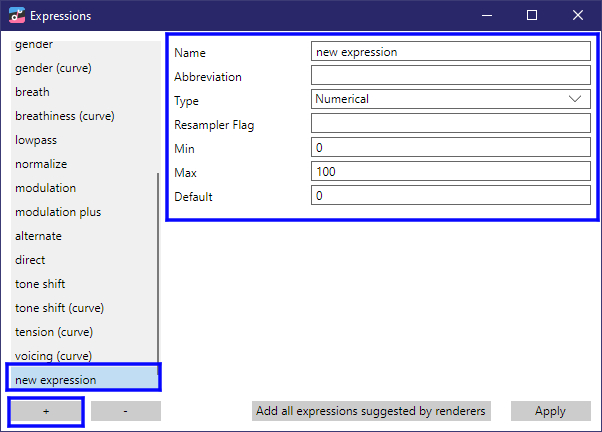
To change these settings, simply open the desired expression in the editor and adjust it's values. There are three different types of adjustments:
"Numerical" type shows a slider for each sample that can be moved up or down within the set range.
"Options" type shows a set amount of labeled options which can also be selected for each sample.
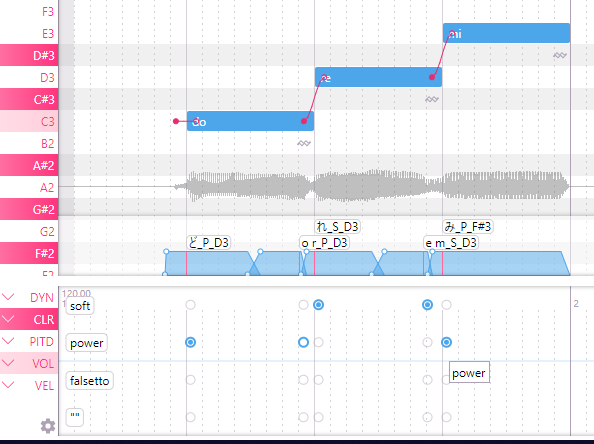
"Curve" is similar to numerical, except you can draw a curve shape to slide between values accross multiple samples rather than setting a constant numerical value for each one.
Tip: You can set the value of multiple samples by clicking and dragging. To change all of them to the same value, hold down shift while doing this (does not work for curves). To reset the value back to default, right click instead of left click.
☆ Plugins ☆
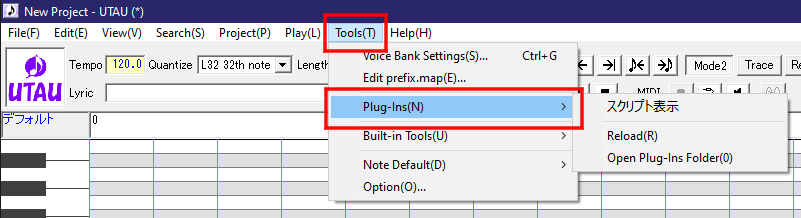
Plugins are optional third-party applications that you can run inside of UTAU; they are typically used to edit the UST in some way that's easier than doing it manually. Since each one has its own settings and functions, I'm not going to go over any specific plugins in this resource, but I will explain how to add them and how to load them inside of UTAU.
Much like a voicebank, you can download the desired plugin and install or extract the contents into its own folder within the UTAU\plugins folder.
Then, to load it into UTAU, you simply navigate to Tools(T) > Plug-Ins(N), and find the one you wish to run on the list. If it's not showing up, try clicking Reload(R). If this doesn't work, either, make sure that the plugin's root folder is directly inside of plugins and not inside of an unnecessary subfolder, and make sure that the root folder has a file called plugin.txt inside of it. plugin.txt, similar to character.txt, is what tells UTAU the name of the plugin and what executable to run when it is called.