☢ Configuring UTAU Voicebanks ☢
A comprehensive guide on configuring UTAU voicebanks, namely how to set up the oto.ini file. This resource assumes no prior knowledge of UTAU beyond what's covered in the introduction page. If you need help with terminology or linguistic concepts, check the vocabulary page.
If you are just looking for a visual reference for how each sample should look in the oto editor, skip to quick reference. If you're looking to understand otoing on a more advanced level, see the oto theory section.
☆ What is OTOing? ☆
OTOing is the term used to describe the process of sectioning off and naming portions of the audio files within a voicebank, then setting a handful of numerical parameters that tell the software how it should stitch with the samples around it. This information is stored in a text configuration file named oto.ini, commonly reffered to as just the 'oto'.
Fun fact: 'oto' (音) is Japanese for 'sound'.
Each voicebank as well as each subbank within a more complex voiceback will have its own oto. Editing the oto is the main part of the voicebank configuration process, and often the part of voicebank development that takes the longest time. It can be a little bit tedious, particularly for larger voicebanks with thousands of samples, but some people find it enjoyable.
Parts of the OTO
Each oto entry has seven componants:
- File name — the name of the audio file being sampled from. Will always be a .wav file.
- Alias — the name of the sample entry; this is what will be used to call specific samples in the synth engine.
- Offset / Left Blank — the parameter which tells UTAU where to begin playing the audio of the sample.
- Consonant / Fixed — the parameter which determines how much of the sample should not be stretched or looped by the resampler.
- Cutoff / Right Blank — the parameter which tells UTAU where to stop playing the audio of the sample.
- Preutterance — the parameter which determines which part of the sample will line up exactly with the beat.
- Overlap — the parameter which determines how much of the sample is crossfaded with the previous note.
Within the oto file, each line is formatted like this:
[file_name].wav=[alias],[offset],[consonant],[cutoff],[preutterance],[overlap]
However, it's much, much easier to use a dedicated oto editor than to try and set them via a text editor.
Base OTOs
Base otos are template files made to do some of the tedious work for you by already creating entries of every sample the voicebank should have. These are reclist-specific, and not a replacement for manual otoing; the parameter values given, if any, are just approximations. Some base otos do not estimate parameters at all and will only provide the sample aliases.
Using bases isn't a requirement, of course, even if a reclist comes with one, but they can make the otoing process faster and easier.
If a base oto is provided as an .ini file, create a copy of the file and place it inside of the folder with the audio files its meant to configure. Make sure to name it oto.ini if it isn't already.
If a base oto is provided as only text, create a new text file in the voicebank folder or subfolder and name it oto.ini, then copypaste the base oto into the blank file. If the voicebank already has an oto.ini that you want to overwrite with a base, copypaste the base text over any existing text inside it.
Note: You'll need encode any files with Japanese characters in Shift JIS, including the oto, otherwise UTAU won't be able to read them properly.
Additionally, setParam and vLabeler are able to generate base otos for existing voicebanks based on their file names, though this is dependant on knowing the BPM of the recordings, the position (in milliseconds) where the utterance begins, and the approximate parameters that should be set for each sample, so I don't really recommend this for beginners; it's much easier to use a premade base.
Automatic OTO Generation
Moresampler*, a resampler and wavtool, also has the ability to automatically generate otos based on recorded voicebanks. This technique is a little bit more advanced, but not by much; it just requires knowing about voicebank and sample types in order to follow the generator prompts. Its functionality is best suited for Japanese VCV and CVVC voicebanks and English ARPAsing voicebanks.
To generate an oto, click and drag the folder that the audio files are located in (be it the root folder or a subfolder) over the moresampler application in the file browser. Then, follow the prompts given on screen. The application will then analyze the audio files and use a predictive algorithm to guess the approximate parameter values. It will alias them based on the filenames, or an OREMO comment file if one is provided.
While useful, this is also not a replacement for manual otoing; moresampler otos are imperfect and will not always place parameters in the optimal position, so each sample should still be looked over. It may also generate unnecessary duplicates which will need to be cleaned up, and depends on the audio files being named in a straightforward way to generate the correct aliases.
Here's a video made by Kanru Hua, the creator of Moresampler, demonstrating its oto generation feature using an earlier version of the application:
Personally, I prefer working with well-made bases over using automatic otos as they require less editing in the long run, but it's a matter of personal preference.
* I don't currently have an active download link to Moresampler; I will link it here when I have one.
☆ OTO Editors ☆
There are (to my knowledge) three different oto editors. First, there is the native editor within UTAU itself, and then there are two external applications, setParam* and vLabeler. Here, I will go over the basics of each editor.
* The official download for setParam seems to be down right now, so here is a reupload of the latest version to a different site in the meantime (I have tested it and it's safe).
OTOing in UTAU
Of the three, this editor is the most basic, but also the most tedious; the external applications provide some significant quality-of-life improvements. Nonetheless, the in-software editor is handy for making quick edits while working on a UST, and it's generally useful to know how it works.
To edit an oto inside of UTAU, load the voicebank you want to edit, then navigate to Tools(T) > Voice Bank Settings(S).... This will pull up the Voice Configurations window.
Here, you can adjust the aliases and parameters by typing in the boxes on the right and hitting Set, or you can open the visual editor by clicking on Launch Editor.
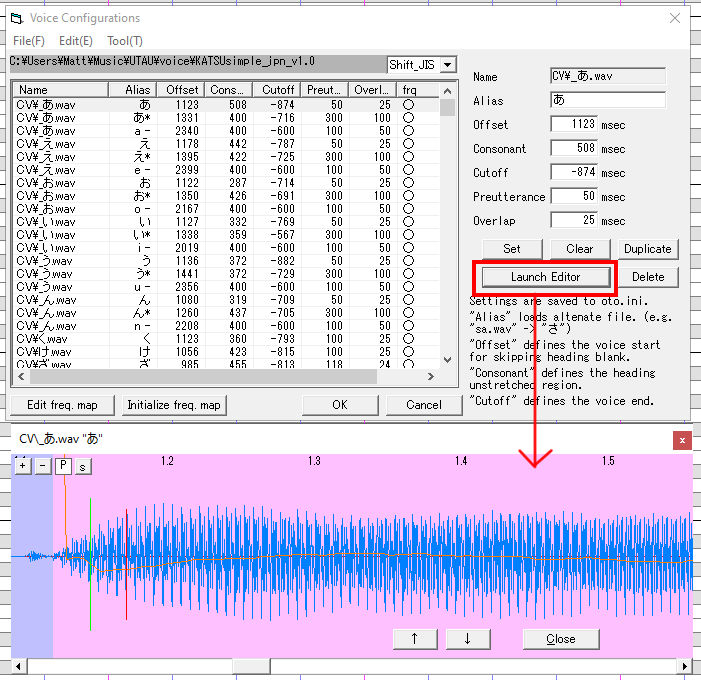
Here, the offset and cutoff are represented by the blue boundaries on either side of the sample, the consonant is represented by the pink highlighted area, the preutterance is the red line, and the overlap is the green line. The white area between the consonant and cutoff is everything that will be stretched or looped by the resampler.
To adjust these parameters, simply click and drag them. This will automatically change their values. To play the sample, hit the P button. To zoom in and out, use +/-. To view the audio data as a spectrogram rather than a waveform, hit the s button.
To duplicate, clear, or delete an oto entry, use the buttons on the right to do so to the currently selected sample, or right-click on an entry from the list. To create a new, blank oto entry, right click on the list, select Create New Entry(C), and enter the name of the .wav file.
To move between samples, the arrow buttons at the bottom of the visual editor can be used.
When you are finished editing the oto, remember to hit OK and not cancel, otherwise all your work will be lost. It's good to do this periodically if otoing an entire voicebank in-software to prevent too much progress being lost if you accidentally exit without saving.
Tip: to make a quick edit to an oto entry while working on a UST, select a note on the piano roll for the sample you want to edit and hit CTRL+G on your keyboard to open up the visual editor for that sample.
OTOing in setParam
To edit an oto in setParam, open the software, then click on the Recording Folder bar at the bottom of the editor window. Find the voicebank folder containing the oto you want to edit, and click Select Folder. If the voicebank has subfolders, open specifically the one you want to edit.
Next, it will prompt you to load an existing configuration file. To load an existing oto or base oto, click Load and select the oto.ini in the current folder, otherwise click Don't Load to build the oto from scratch.
Intermediate Technique: To generate a CV or VCV base oto for the current voicebank or subbank, select Automatically Estimate Voice Configuration Parameters and fill out the parameters in the window that pops up.
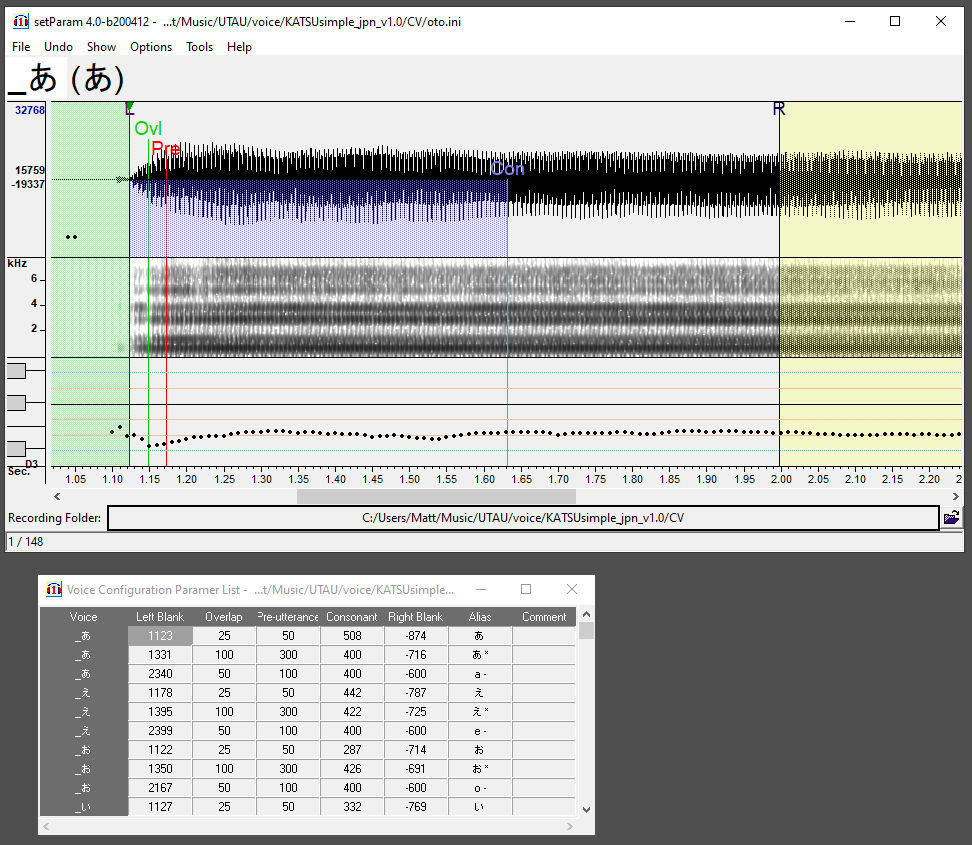
Editing in setParam is quite similar to editing in UTAU, with some differences in presentation. The offset (called 'left blank' here) is green, the cutoff (called 'right blank' here) is yellow, and the consonant area is blue. The preutterance and overlap are still represented as red and green lines.
The main difference you might notice in this screenshot is that the spectrogram is visible alongside the waveform, which can make it a lot faster to tell where a parameter is supposed to go by having both visual representations on screen at once. Below that is the F0 (base frequency, AKA musical pitch) of the current sample. All of these can be toggled as visible or not in the Show menu, and the scope of the F0 window can be adjusted in Options > Advanced Settings.
Much like UTAU, you adjust the parameters by clicking and dragging them on the visual editor. I recommend enabling the setting Mouse and Key Settings > When left blank is modified, > other parameters are modified accordingly [...] if it's not already to ensure that when the offset is moved, all other parameters will be moved along with it.
To play the current .wav file, hit spacebar on your keyboard. To play particular regions of the current sample, click on spaces between parameters in the editor (if Partial Play By Click is enabled), or use CTRL+F1 to CTRL+F5 on your keyboard. To move between samples, scroll up and down with your mouse, or click on specific samples in the parameter list.
To batch edit sample aliases, such as to add a prefix or suffix to them, go to Tools > Change Aliases.
SetParam comes equipped with even more built-in tools that you can take advantage of in your otoing, but I won't be covering everything it can do here. I suggest playing around with the settings and tools until you get a feel for what workflow works best for you.
OTOing in VLabeler
VLabeler does more than oto UTAU voicebanks, but that's all that I'll be covering here. To start a new editing project in vLabeler, first open the software and click on New Project. Click on the Sample Directory box to open the file explorer and navigate to the root folder of the voicebank you want to edit. vLabeler will load all subbanks within the root folder as part of the same project.
Click Next, then set the Category as UTAU and the Labler as UTAU singer labler.
Finally, select Create by... Default and set the encoding to Shift JIS. Turn on Auto-Export if you want to automatically overwrite the oto.ini file when the vLabeler file is saved, or leave it off if you want to export the oto manually.
Intermediate Technique: VLabeler can generate CV, CVVC, and VCV base otos. To do this, rather than load the root folder, load a specific subbank of the voicebank (if it has more than one), choose UTAU oto labler on the second page, and then Create by... Template generator on the third page. Select the type of base oto from the dropdown menu, and click on the gear icon to customize the parameters.
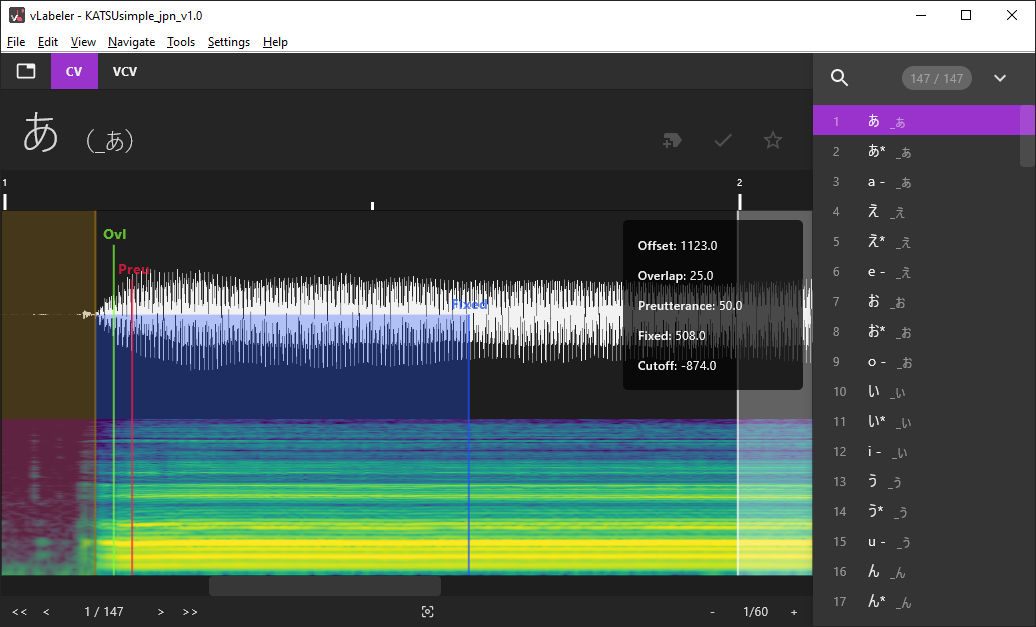
This editor is very similar to setParam. There may be some differences in the display colours depending on your user preferences; I customized the accent and spectrogram colours of mine. Here, the offset is yellow, the cutoff is white, the consonant area (called 'fixed' here) is blue, and stretching/looping area is black. Once again, the preutterance and overlap are red and green lines.
To choose which windows are visible and to customize their display settings, navigate to Settings > Preferences and go to the Charts tab of the Preferences window. Here, you can edit the settings for the waveform, spectrogram, F0, and so on. When you're done, click OK.
To edit the parameters in the visual editor, click and drag them. To have every other parameter move when the offset is adjusted, navigate to Tools > Preferences > Editor > Fixed-drag and select Fixed-drag at the start of entry from the dropdown menu; I recommend enabling this.
To show or hide the numerical values of the parameters in the editor, navigate to View > Show Properties or hit CTRL+1 on your keyboard. To edit a parameter's numerical value, click on it in the parameter window. To change a sample's alias, click on it in the top bar.
To move between entries, scroll up and down with your mouse over the editor, or click on them from the sidebar. To mark entries are complete or incomplete, click on the checkmark icon in the top bar. To bookmark them, click the star icon. To give the entry a specific label, click the label icon.
To batch edit oto entries, such as to add a prefix or suffix to sample aliases, go to Tools > Batch Edit and find the action you want to perform.
Like setParam, I recommend playing around in the software until you find a good workflow, as it can do a lot more than what I've covered here.