☢ UTAU Interface & Settings ☢
☆ Interface Overview ☆
The UTAU interface functions very similarly to other MIDI softwares. Here, I've labeled most of the general functions:
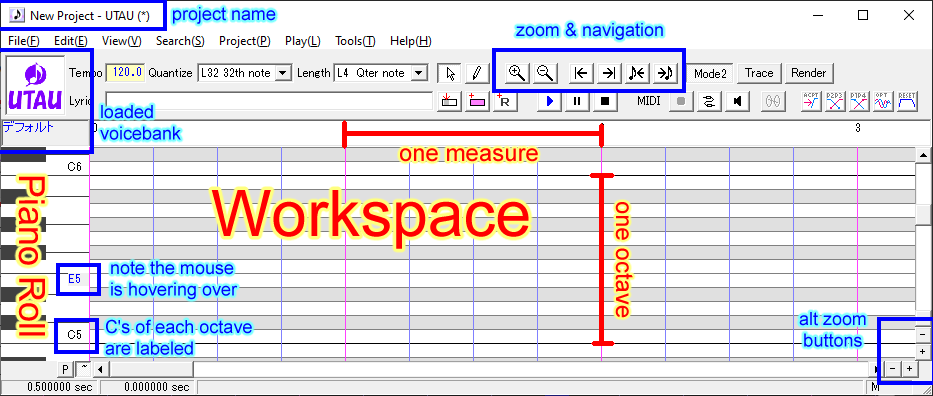
Hovering over most buttons will also tell you what they do.
As mentioned, clicking the voicebank name is a shortcut to the project settings. Clicking the voicebank icon will open the voicebank info.
☆ Project Settings ☆
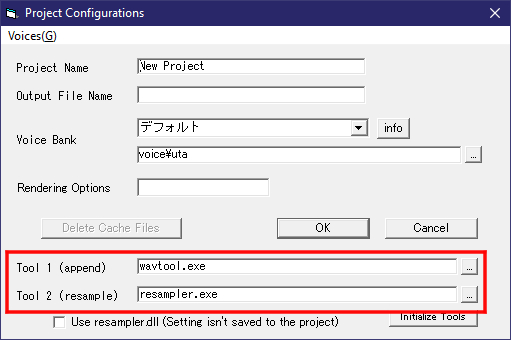
UTAU project files are called USTs, which stands for UTAU sequence text. To change the settings of the UST, we use the Project Configurations window, which will pop up on the prompt for creating a new file, or can otherwise be opened using the methods discussed previously.
The project name is usually the name of the song. This is not the same as the name of the UST file, which we choose upon saving like in any other software. Therefore, this isn't necessary to set, but it can help you stay organized if you're working with multiple USTs at once. The output file name is the name of the .wav file that will be rendered from the UST; it's not necessary to set this, as we can name it whatever we want when we go to render the file.
☆ Render Settings ☆
Resampler & Wavtool
The resampler is the executatable that actually performs the rendering process; it takes the samples included in a voicebank and, well, re-samples them based on the note settings. UTAU comes with a default resampler, but there are many others that can be downloaded and used. The wavtool handles the way the samples are strung together; most resamplers will work with the default wavtool, but not all of them are compatible with every wavtool and vice versa.
Each resampler functions slightly differently, so the resulting render will be different even for the same voicebank. A lot of voicebanks will list what resamplers they recommend in their readmes, but you may experiment with different ones until you get one you like the sound of. Here is a comprehensive list of resamplers and wavtools (archived), including download links and example renders.
I'm partial to moresampler for clean vocals (note that moresampler also needs to be set as the wavtool to function) and tn_fnds for "pitchless" vocals such as growls and whispers, but again, this is going to vary from voicebank to voicebank, and your preferences may differ from mine. I also periodically use TIPS and bkh01.
You can download your resamplers directly into your UTAU program file, or, as I do, keep them in a subfolder. If they are in a .zip or .rar, be sure to extract them.
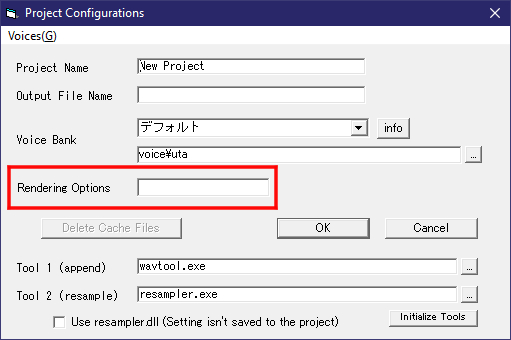
To change the resampler in UTAU, open up the project settings and, next to Tool 2 (resample), either type in the name of the executable, e.g. TIPS.exe, or click on the ... button to locate the .exe yourself. Note that if your resampler is in a subfolder, you'll need to type in the local file path, e.g. resamplers\TIPS.exe. If, for whatever reason, it's not in your UTAU folder at all, you'll need to type in the entire file path, e.g. C:\Users\[user]\Documents\resamplers\TIPS.exe.
To change the wavtool, do the same but with Tool 1 (append).
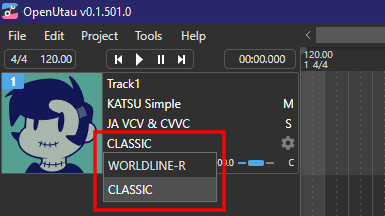
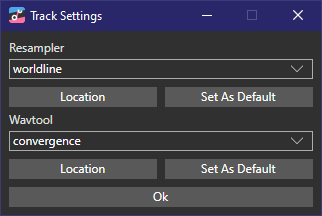
To change the resampler or wavtool in OpenUTAU, click the Select Renderer dropdown menu on the track settings and choose CLASSIC. Unlike UTAU, this will only change the resampler for this specific track rather than for the whole project.
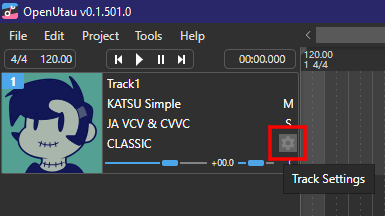
Next, click the gear icon to select the specific resampler and wavtool you want to use for that track. You may have to navigate to their files directly by clicking Location. You can also set one of them as default.
UTAU Flags
Flags are specific render settings that are used to alter the sound of the samples, mostly through adjusting the frequencies and formant. To oversimplify a complex topic, frequency is the pitch at which a note is sung as well as all of the overtones that come together shape the sound. Formant referers to what region of frequencies is most intense. Flags are completely optional to use.
Some flags are universal, while others are resampler-specific. For a comprehensive list of flags and some resamplers, I highly recommend this resource by susrever (PDF download). Alternatively, here is a quick reference hosted on Tumblr.
Like resamplers, a lot of voicebanks will list their recommended flags in their readmes.
To apply flags to the entierty of UST, type them into the box next to Rendering Options in your project settings. The syntax should be X#Y#Z#, with the flag's name and value and no spaces between them, like g-5B30H20. The order of the flags doesn't matter, but note that flag names are case sensitive, meaning that an uppercase letter like G is different from a lowercase letter like g.
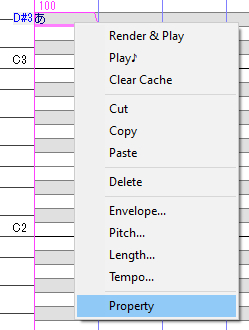
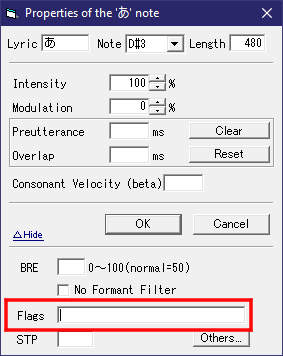
Alternatively, you can add flags to specific notes by selecting all of the notes you want to apply it to in the piano roll, right-clicking, going to Property, and typing them in the flag box of the note properties menu.
OpenUTAU Expressions
Expressions are OpenUTAU's equivalent to flags. They can be viewed and changed using the bottom section of the track editor.
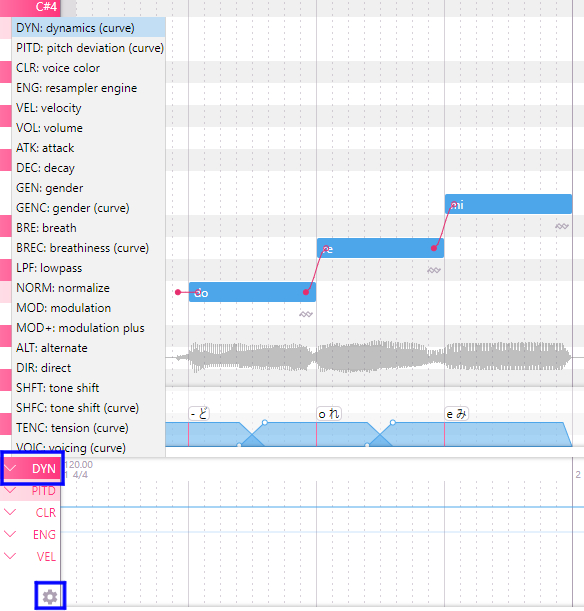
To use UTAU flags that aren't already included in OpenUTAU, you can create new expressions and adjust them as needed for that flag. These settings will only apply to the current project. Note also that this will add this setting to the entire project not just the current track, which may cause rendering errors if you are using different resamplers.
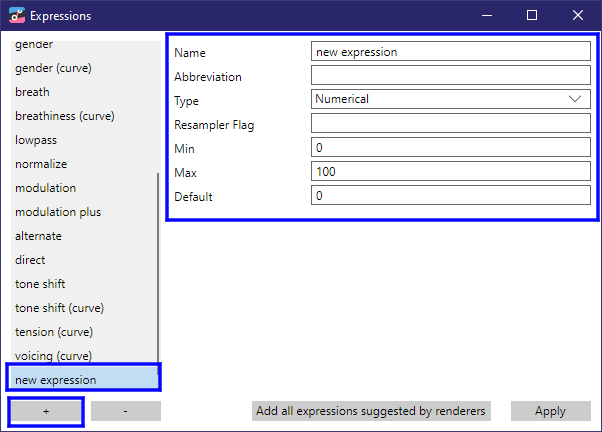
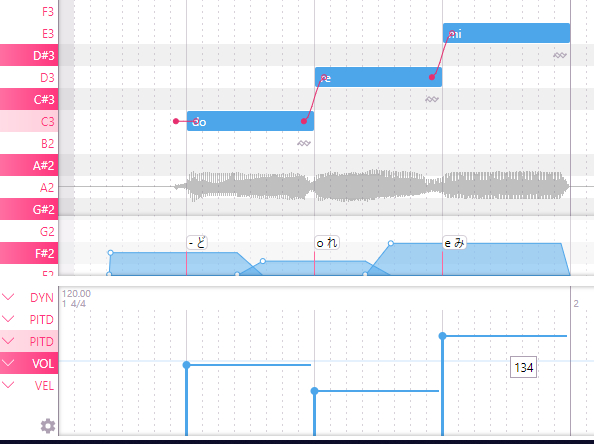
To change these settings, simply open the desired expression in the editor and adjust it's values. There are three different types of adjustments:
"Numerical" type shows a slider for each sample that can be moved up or down within the set range.
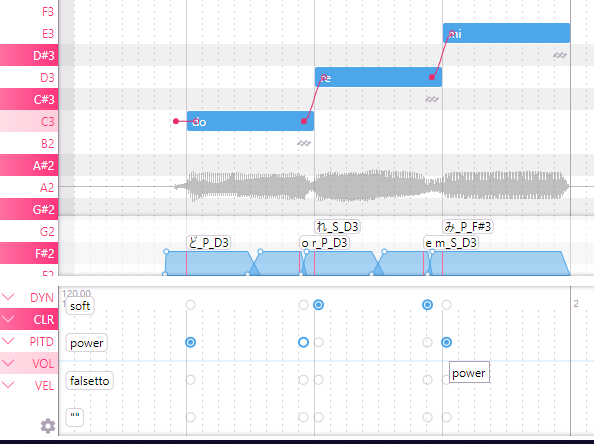
"Options" type shows a set amount of labeled options which can also be selected for each sample.
"Curve" is similar to numerical, except you can draw a curve shape to slide between values accross multiple samples rather than setting a constant numerical value for each one.
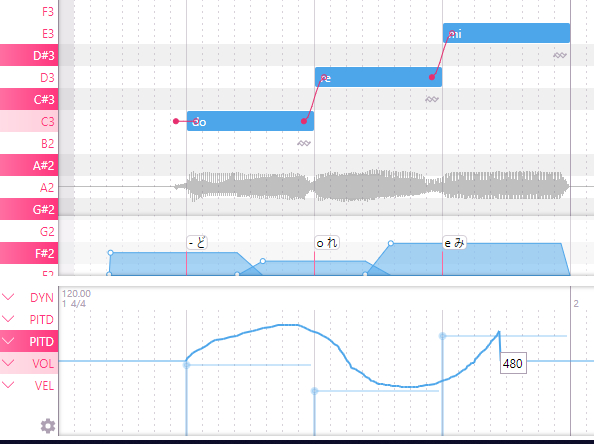
Tip: You can set the value of multiple samples by clicking and dragging. To change all of them to the same value, hold down shift while doing this (does not work for curves). To reset the value back to default, right click instead of left click.
☆ Plugins ☆
Plugins are optional third-party applications that you can run inside of UTAU; they are typically used to edit the UST in some way that's easier than doing it manually. Since each one has its own settings and functions, I'm not going to go over many of them in this resource, but I will explain how to add them and how to load them inside of UTAU.
Much like a voicebank, you can download the desired plugin and install or extract the contents into its own folder within the UTAU\plugins folder.
Then, to load it into UTAU, you simply navigate to Tools(T) > Plug-Ins(N), and find the one you wish to run on the list. If it's not showing up, try clicking Reload(R). If this doesn't work, either, make sure that the plugin's root folder is directly inside of plugins and not inside of an unnecessary subfolder, and make sure that the root folder has a file called plugin.txt inside of it. plugin.txt, similar to character.txt, is what tells UTAU the name of the plugin and what executable to run when it is called.
